JVC NZ Home Theater Projector Setup Guide

JVC NZ7, NZ8, and NZ9 Tips & Tricks

If you are reading this, it is likely you are either a lucky new owner of a new JVC NZ projector — or perhaps you are considering a JVC NZ projector and wondering how the setup will go. For those of you who are new owners, congratulations!

This article covers our approach to setting up the superbly performing JVC NZ projectors, which includes the combined best practices from JVC and Audio Advice technical experts. 

Please note that these models have incredibly deep menus with hundreds of possible adjustments & many of these adjustments are best utilized by professionally trained calibrators. 

However, JVC has anticipated the needs of most users and thus has automated almost all of the adjustments out of the box that you will need to project an outstanding picture.   Thus, we strongly recommend that JVC’s default settings are what you should utilize.

For those that feel the need to tweak we strongly recommend that you do not change the red, green, and blue color levels found deep in the Gamma settings.  That is professional calibration territory & it is easy to make a mess there and importantly please note that a factory reset will not restore them.

Having said that, there are some simple things you can do when you install your projector that will make a big difference in its performance.   

Anyone doing a DIY installation should be capable of performing these steps & and thus getting maximum value and the best picture possible for your investment..

We highly recommend you complete these in the order we present them in this guide.

We apologize if the images of the menus do not look perfectly consistent. We had to take pictures of them in our lab 🙂

Initial Installation

For Ceiling-Mounted Installation:

STEP 1: Please note we have seen some projectors delivered from the factory where the NZ installation style is automatically set as “front”.  Thus, if at first you mount directly on the ceiling, the menus will be upside down. We recommend that you start by putting the projector on a table to change the settings to “front ceiling” instead of “front”.

To make the change: select Menu, scroll down to Installation, choose Installation Style, and then select Ceiling Mount and Front.

( Menu >> Installation >> Installation Style >> Ceiling Mount and Front )

STEP 2: Remove the feet from the projector since this is where your mount will attach.

For Non-Ceiling Installation:
Unit is ready for the next step.

Finding the Right Location

All Projectors, including the NZ series, have a defined throw distance spec. This is the minimum and maximum distance that a particular model will be able to properly fill your screen. 

Through extensive testing of the light output available at various throw distances, we have determined that if possible, it is best to position the projector at the shortest end of the range practical for your room.  This will give you the highest lumens which is beneficial for HDR.  You can then use the settings we will review below to improve contrast if necessary.

The great news is you will not need to get out your slide rule to find the range of positions.  Simply use our projector throw distance calculator, select your JVC model, enter in your screen size, aspect ratio, and if you are using a Panamorph lens.  The system will then show you the available throw range.  

STEP 1: Ensure that both your screen and projector are perfectly level.

STEP 2: Determining the ideal vertical (height) and horizontal (left-right) position.  

Ideally, the projector should be dead-centered on the screen, but of course, that is usually not possible in a typical home theater. 

The NZ series does have lens shift to compensate.  We highly recommend you get your projector perfectly centered left to right and keep the top of the lens height right at or below the height the top edge of your screen material is off the floor. 

If you must raise it up more, the Audio Advice projector tool will show you the range available but we highly recommend you keep the projector below or even with the top of your screen image if possible. 

Physical Mounting of Your Projector

You want to have your projector as level and aligned with your screen as possible.  

If your room is a rectangle, find the centerpoint of your screen from one wall and make sure the center point of your mount is that same distance from the same wall you measured for the screen.

Once you have the projector centered use a level to get it level in the mount.  Many projector mounts give you fine adjustments for this.

Audio Advice Pro Tip: The final step is to make sure the projector is perpendicular to the screen.  Use a laser type tape measure positioned at the far front corners of the projector and twist it slightly using the mount adjustments until your readings are identical.

Explore more free home theater video optimization & upgrade tips

We appreciate your support of Audio Advice and hope these tips will help you get the best out of your new projector.

At Audio Advice, we've been designing and installing high-performance home theaters & smart home systems for decades. In fact, we've delivered more custom theaters than anyone in the Southeast! We are now offering Home Theater Design no matter where you live in the United States. If you are interested in a custom home theater or upgrading your current system, give us a call at 888.899.8776, chat with us, or stop by one of our award-winning showrooms.

Set Image Positions

Once you have your projector hung in the right spot, it’s time to get your image perfectly zoomed in and focused. 

Pull up the installation menu and go to Image Pattern.  

  • Turn it on and use the lens control functions on the remote to zoom, shift, and focus. 
  • If you have a widescreen, you will need to do this for both 16:9 and your widescreen image and store each setting. 
    • You can do this under the Installation Menu where you have up to 10 settings you can store and name.

Pro Tip: We find when you are zeroing in on getting the image perfectly filled to your screen, if you use a sheet of white paper held against the edge of your screen frame where it is against the screen material, you can see how much overscan you have.  We suggest roughly ¼” of overscan

Also, when you go to make the image size adjustments, start off by making a very large one, then make the finer ones.  We have seen if you are very close to start with and only make a small one, it may not stick in the memory setting. 

Pixel Alignment

This is the part that will typically make the biggest difference of all!

Your projector has red, green, and blue panels. They can sometimes come slightly out of alignment so you should always check this after installing your projector.  The steps below detail how to realign….it is a bit time-consuming, but in our opinion, well worth it. 

STEP 1: Turn on your projector and have it running for at least 30 minutes before you start this. (please note that there is no need for your projector to have “burned in”; you can adjust right out of the box).

STEP 2: Open the manual and turn to page 71 which is where you find the Alignment process. 

  • We suggest you first do the whole under Adjust Area.  If after you do the whole you notice some parts of the screen are not perfect use the fine tune steps to adjust those sections.  You will need to do this for both Red and Blue and are looking for a white line with little color bleed over.

In addition, we have compiled a video to assist you on accomplishing the alignments.  

Please keep in mind that this is a tedious process and the best tip we can give you is to periodically give your eyes a break as you are going to be staring at some bright white lines. 

To navigate to the area where you perform the alignment choose the 3rd tab from the left, Pixel Adjust, then follow the steps.

Pro Tip: We find if you close your eyes for about 10-20 seconds before you go to the next zone, you’ll be able to focus better on the adjustments.

Picture Modes

Picture Modes is the JVC capability set that allows you to configure settings for each mode & then have the unit automatically adjust for each mode.

This next section will show the main menus that you’ll use to set up a Picture Mode for each  Content Type.  Picture #1 below is the first menu that comes up when you hit the JVC Remote’s Menu button.  As you can see, “Content Type” is the first line.  

STEPS: Select Content Type “SDR”, we suggest that you use Natural. 

Select Content Type HDR10, we recommend selecting “Frame Adapt HDR”. Color Profile BT.2020, Frame Adapt, Frame-by-frame

Pro Tip: Owners of the NZ8 and NZ9 have another color profile option called BT.2020-Wide. This provides a slightly better color gamut but at a sacrifice of about 30% of the maximum light output.  If you have a smaller screen ( usually under 120” 16:9) you may want to try it. If you do and when you get to the light measurements further below and can not get enough Nits for HDR, you will want to revert back to BT.2020 and redo the measurements.  Most people should stick with BT.2020 for maximum output needed for HDR.

Finally set HDR10+ for HDR10+.

Theater Optimizer

Your JVC has a great system to further optimize it for your exact situation.  For this to work perfectly, it needs to know some information about your screen.

Go to the HDR10 user setting under the picture menu, select Theater Optimizer then move to the page for the settings.  Select set and enter the values that match your system.

For now we are done with the picture settings but will come back to them in the next section. 

Picture Mode Select

Now that we have defined the modes we need to tell the projector to automatically select them when it sees that mode.

Go to the second upper tab at the top and then select Auto Pic.Mode Select.

Then change the settings to what we show below.

The Projector then takes care of switching to the correct Picture Mode without your having to do anything further.  We think this is a fantastic feature, which makes using the Projector so much easier and more automatic. 

Congratulations! Your projector is set up and ready to enjoy!

Optional Expert Setup

If you have followed all of the steps above, you should be happily enjoying your projector. This next optional section is designed for experts or enthusiasts who want to try to eke out everything you can to achieve the most accurate picture possible and is one of the key steps that professional calibrators follow when setting up a projector. This section is broken into the theory section of what you are doing and then an application section walking you through exactly what to do.

Theory Section: Elements that Affect Maximum Light Output and Maximal Contrast

Picture Optimization in your Projector environment is impacted by the right combination of brightness and contrast.  The variables listed below are the ones that can be adjusted to find the right balance of light output and contrast.  They are:

  • Throw Distance
  • Laser Output
  • Iris Aperture
  • Dynamic Laser

Note: you will need a light meter (Amazon sells an inexpensive one) to measure brightness.

Definition: brightness on the screen is usually measured in terms of Nits or Foot Lamberts (fL). This is a specific amount of light in a defined area of screen. People do differ in terms of how bright an image they prefer, but there is general agreement that having around 50 Nits (15 fL) for SDR (Standard Dynamic Range) content, and over 80 Nits (30 fL) for HDR (High Dynamic Range) content, works very well for most Home Theaters.

And bear in mind you may prefer a brighter image due to your own personal tastes, so feel free to shoot for higher numbers if the result looks more visually pleasing to your eyes in your room. 

In the section below we will go over the theory behind each of these variables.   If you do not care to understand the “why” you can just skip to the Putting it all together section for the “how.”

1. Throw Distance:
The closer your Projector is to the Screen, the greater its measured light level at the screen will be (that is, the amount of Lumens hitting the screen). For example, at the closest throw distance it might be measure 2200 Lumens, while at the farthest throw distance, it could measure 1320 Lumens, around 40% less.

Contrast is the range between the blackest blacks and the whitest whites.  Contrast has a very significant impact on overall picture quality, giving the image the 'pop' that we're all looking for. 

In general, the higher the contrast, the better the picture. The amount of Contrast we get with the Projector varies in the opposite way from Lumen output, so that Contrast is lowest at the shortest Throw Distance, and greatest at the longest Throw.

But there is a way to have our cake and eat it too!

2. Laser Output:

The Projector has 3 different levels of Laser Output: Low, Medium and High. 

Which setting is “best” will depend on the Throw Distance, along with the Screen's Size and Gain. The goal is to achieve the proper number of Nits (brightness) for both SDR and HDR as we talked about above.

To determine the number of Nits you have requires the use of a Light Meter (you can use a Light Meter App on your SmartPhone, or purchase a Meter for this purpose. A great one for the money is the Dr. Meter which can be purchased on Amazon).  

Being able to take measurements of these different levels is critical to getting the best combination of output and contrast.

3. Aperture:

Aperture is the opening through which the Projector sends its light, analogous to the iris of your eye, or a camera. With the Aperture wide open, the greatest amount of light comes through, but with the lowest amount of Contrast. As you close it down, the amount of light decreases, while the Contrast increases. 

Your NZ projector has adjustable aperture which we will use to our advantage to get both the right light output and the best contrast.

4. Dynamic Laser:

This feature allows the Projector to automatically lower the Laser Output in the darker scenes of a given show or movie, deepening the Black Level. One of the key benefits of having a JVC Projector is having “inky blacks” which contributes to the amazing picture quality they have.

Of course, when the Laser Output is lowered, this will also decrease the amount of light available for the brighter elements still on screen. However, your JVC projector looks to compensate for this, through a process called “gamma manipulation” where it  boosts the brighter elements in the scene.

We will show you how to enable it in the next section.

Application Section: Putting it All Together

As noted earlier, JVC ships the NZ series Projector with almost all of the settings needed for most users/environments.  Thus, it is beneficial NOT to change any of the Projector’s settings EXCEPT for the ones we will discuss below.  Adjusting the settings below will provide the best combination of light output and contrast for your unique setting.

We assume you have already mounted your projector according to our instructions in the first section

  1. Maximize Brightness
    • We assume you have already mounted your projector according to our instructions in the first section
    • This will give you the most light output with the least contrast but we will adjust that next
  2. Measure Light Levels

We want you to do this for all three of the laser output levels for both SDR and HDR to get a baseline for your system. You will have 6 numbers when you are done

Go back to the Picture Mode tab in the top left and navigate to the screen you see below,  You want to make sure that Dynamic CTRL is Off, then for SDR (Natural) you will measure the light output with LD Power set to Low, Mid, and High, then do the same for HDR (Frame Adapt HDR)

STEP 1: Find a “100 IRE White Field test image* and project the image in SDR. Make sure any lighting in your room is turned off when you do these tests. 

  • Put your projector in the picture mode Natural you set up earlier - Make sure the Aperture is wide open  which is set to zero
  • You will need to send a 100 IRE White Field image from the Projector.  

*Test material can be found on test material from YouTube (for example, see this one), or on commercially available Test Pattern Discs like Disney WOW, Spears & Munsil, etc. 

STEP 2: Meter Placement - Place the Meter in the center closely adjacent to the screen and facing directly toward the Projector's Lens. 

STEP 3: Measure - Set the Meter to read in Lux, and then just write down the measurement. 

STEP 4: Calculate - To get the number of Nits, simply multiply this number by the Gain of your Screen, and divide by pi (3.14).  Write down this number and note the laser setting.

STEP 5: Repeat for the other two laser output levels

STEP 6: Repeat for HDR (Frame Adapt HDR)

3. Optimize the Combination of Laser and Aperture Settings

The goal here is to have the right amount of brightness, with the greatest amount of Contrast, to provide the best possible picture.  Putting the projector on a setting that provides more light output than you need and then closing the Aperture is the magic behind getting there. The key to doing this is to have target nit levels for both SDR and HDR. We recommend using 50 nits as the target for SDR and 100 nits for the target for HDR. These represent a great balance between maximizing brightness and maximizing contrast. If you measure your nits at High Laser and they are below these numbers, then there is no additional work to be done and you should be getting the best balance possible given your size screen. If you projector can produce nit levels over 50 and 100 for SDR and HDR, then you may want to follow the below steps to optimize your picture

Please note that many people may prefer a brighter picture and are less concerned about having perfect black levels. If you fit into this category, feel free to use a higher nit level, say 55, 60 or higher for SDR or 105, 110, or higher for HDR. Or you can follow the below steps that target 50 SDR and 100 HDR. When you are done, if you feel it's too dark then redo the steps using a higher nit level target. 

We will do SDR first, what you will do will depend on the measurements you just completed.  Our SDR target is 50 Nits.

Examples:

If you measure 50 Nits with Low Laser, with the Aperture wide open (i.e. at 0), then you might assume this could be used without any changes. 

  • But let's say you measure 70 Nits with Medium Laser, with the Iris wide open. By modifying the aperture to the target of 50 Nits, we will be able to improve the Contrast
  • So, close the Aperture until you again read that same 50 Nits. 
  • As an example, you might then be at -6 for the Aperture 
  • The end result is that since the Aperture is smaller, you will have a higher contrast resulting in a better picture.

I you measure 100 Nits with High Laser, you could then close down the Aperture even more until you get to 50 Nits. 

  • This might be -15 for example, which would produce more Contrast resulting in an even better picture. 
  • It's also possible that even with the Aperture all the way closed, you would still be higher than 50 Nits. 
  • In this case, it would be best to just use Medium Laser.

Every time you make a change, you’ll need to take the measurement with the light meter and do the math to convert the number to nitsHowever,  this exercise is well worth it if you want the best picture. 

  • HDR (target of 100 Nits)
  • Utilize the process above using the Projector's HDR Picture Mode & aim for a target of 100 Nits.

For convenience in saving you time doing the math, these are the Lux readings you should target, but bear in mind, you may prefer to have a higher Nit level for HDR.

Screen Gain Target SDR Lux Target HDR Lux
1 157 314
1.1 143 286
1.2 131 262
1.3 121 242

Other Settings

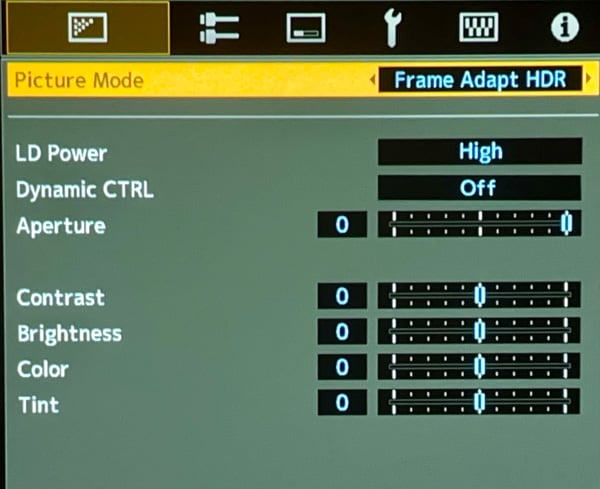
Contrast and Brightness Settings
If you want to fine tune things for SDR, please use our video to make those adjustments, but as a general rule, you should not change them more than +2/-2.  

Gaming
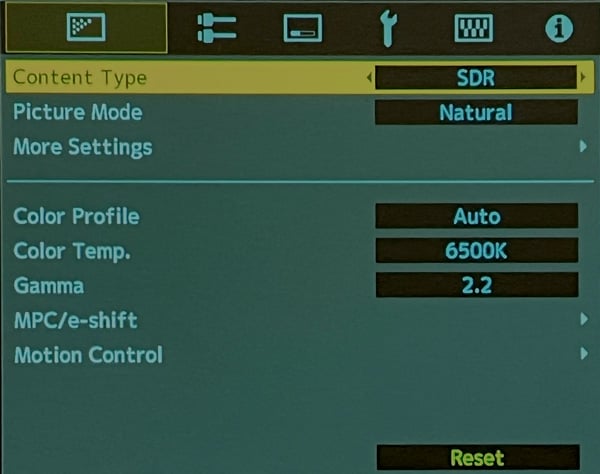
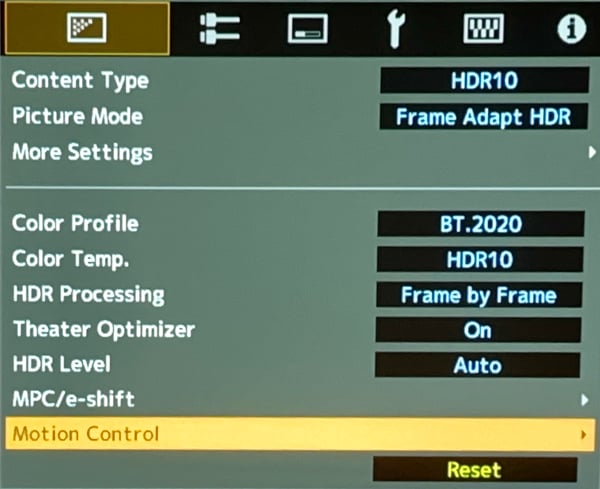
If you want to enjoy video gaming on your NZ projector, we recommend you use one of the 9 presets to store a setting for gaming only, as for normal content the picture is better with the gaming mode off. However, this setting does reduce lag. This is found under the Picture menu, Motion Control, then Low Latency- turn this on but leave the other two motion settings off.

Fast Moving Sports, ie Hockey
Some people like to try the motion reduction software which is also found under Motion Control, you can experiment with the settings under Motion Enhance and if you prefer them, store them under another preset.

JVC’s Special Auto Calibration Software
If you do want to take things a little further down the calibration route, you can download JVC’s free software here.

This software requires a Windows laptop and an aftermarket Datacolor SpyderX which will run you about $200. You will see that some SpyderX products are more expensive than others, but they only differ in terms of the software provided with it. The meter itself is exactly the same. So because you’ll be using the JVC software instead of the Datacolor software, you can get the least expensive version you can find.

You will also need a good tripod to attach the Spyder to that allows you to put it in the exact middle of your screen.

If you can do all this, it is automatic and you will just follow the steps. 

Be sure to remember to save the new settings to your projector when you are done. 

Please note that the first time you do this, the software will automatically generate “INIT” files which are downloaded to your computer. It is very important for you to know where these are, and to back them up as well. These files are the only way to get back to your Projector’s original calibration state should something go awry with your own calibrations.

We appreciate your support of Audio Advice and hope these tips will help you get the best out of your new projector.

MORE VIDEOS & REVIEWS

Wishlist
Copyright © 2024 Audio Advice. All rights reserved.