JVC NP5 4K Home Theater Projector

Tips & Tricks Setup Guide

Congratulations on the purchase of your new JVC NP5 projector!

Our team has collaborated extensively with JVC's technical experts to provide you with the most comprehensive guide on properly setting up your NP5 projector. It boasts a highly intricate menu with hundreds of customizable options, specifically designed for professionally trained calibrators. JVC's approach aims to provide calibrators with a vast array of tools to ensure an optimal viewing experience for every user. However, they also understand the average projector buyer may not want to pay for a professional calibration.

JVC has automated almost all of the adjustments, which means you won't need to change much out of the box. The default settings are already optimized, so you should leave most of them untouched. While you're free to experiment with the settings, adjusting the Gamma settings without the proper knowledge could do more harm than good, and even a factory reset won't restore them.

Fortunately, there are a few simple yet crucial steps you can take during the installation process to significantly enhance the projector's performance. These steps require only a little patience and are easily manageable even for DIY installation. In fact, we believe that following the following recommendations is even more beneficial than hiring a professional calibrator to experience unparalleled picture quality with your NP5 projector.

Installation & Optimization For Your JVC NP5 Projector

When it comes to installing your JVC NP5 projector, there are a few key steps to ensure optimal performance. If you plan to mount the projector on the ceiling, we recommend first placing it on a table and changing the default front setting to front ceiling to avoid having to read the menus upside down. You can easily do this by selecting the Menu, scrolling down to Installation, then choosing Installation Style, and selecting Ceiling Mount and Front.

If you are ceiling mounting, you’ll want to then go ahead and remove the feet from the projector as that is where your mount will attach.

Where do I mount my projector?

Once you have determined the ideal mounting method for your projector, it's important to consider the throw distance, which is the minimum and maximum distance the projector can properly fill your screen. 

Where it really gets tricky is when you are doing a widescreen system and using lens memory to zoom out to fill your 2.35 or wider aspect ratio screen. 

Use our free Projector Throw Distance Calculator to determine ideal throw distance, projector placement, and screen size and gain in your home theater. Projectors have been tested in our lab and use precise data to show the exact brightness on the screen. If you're designing or updating a home theater, explore our Free Home Theater Design tool, which will calculate all of your home theater specifications including speaker, seat, projector and screen locations.

If you have flexibility in placement, please read through the section below on optimizing the picture before you determine your final mounting position.  

You will also want to get the height of your projector in relation to the screen at the ideal position. In the perfect world, it would be dead-centered on the screen, but that is usually not possible in a typical home theater. While the NP5 does have lens shift, we highly recommend you get your projector perfectly centered left to right and keep the top of the lens height right at or below the height your screen material is off the floor. 

If you must raise it up more, please use the chart on page 22 of your manual to calculate the amount you can, but it is best to stay within the screen if at all possible.

Also, be sure both your screen and projector are perfectly level.

Fine Tuning & Lens Memory

Once you have your projector hung in the right spot, it’s time to get your image perfectly zoomed in and focused. If you pull up the installation menu and go to Image Pattern, turn it on and use the lens control functions on the remote to zoom, shift, and focus. If you have a widescreen, you will need to do this for both 16:9 and your widescreen image and store each setting. You can do this under the Installation Menu where you actually have up to 10 settings you can store and name.

Pixel Alignment

It is highly likely that the 3 panels in your projector will have become slightly misaligned during shipping, which can greatly impact its performance. We believe that realigning these panels is the single most impactful step you can take to improve your projector's image quality. Although it may be time-consuming, we strongly recommend taking the time to realign your panels and in our opinion, it is well worth it. 

For best results, ensure your projector has been warming up for at least 30 minutes prior to starting the process. You can perform this step right out of the box, without any prior burn-in period necessary.

To properly align the panels, refer to page 71 of the manual, which outlines the necessary steps in detail. We recommend following the entire process, starting with the initial alignment and then fine-tuning as necessary.

It is a tedious process and the best tip we can give you is to give your eyes a break as you are going to be staring at some bright white lines. We find if you close your eyes for about 10-20 seconds before you go to the next zone, you’ll be able to focus better on the adjustments.

Settings Adjustments

As we said earlier, you do not want to change the projector’s default settings other than the ones will talk about in the next section. JVC tells us they have spent a lot of time getting them right and you’ll get the best picture if you just leave them alone.

How to Achieve Optimal Light Output and Maximal Contrast

There are several variables that can be adjusted to provide the best combination of light output and contrast:

  1. Throw Distance
  2. Light Output
  3. Iris Aperture
  4. Dynamic Iris

We want to try and achieve the correct amount of brightness with as much contrast as possible.  All four of these factors will affect the final outcome.  

Brightness on the screen is usually measured in terms of Nits or Foot Lamberts (fL). This is a specific amount of light in a defined area of screen. People do differ in terms of how bright of an image they prefer, but there is general agreement that having around 50 Nits (15 fL) for SDR (Standard Dynamic Range) content, and 100 Nits (30 fL) for HDR (High Dynamic Range) content, works very well for most Home Theaters.

Our goal is to show you how to obtain the right amount of brightness for SDR and HDR while maximizing contrast.  The great news about the JVC NP5 is, you will set up two different Picture Modes for SDR and HDR and the projector will automatically switch based on the incoming signal. We will show you how to set this up under the putting it all together section.

We'll talk about each one of these and explain how they can influence the picture, then at the end,  show you how to put it all together to properly configure your Projector.

1. Throw Distance:

The closer your projector is to the screen, the greater its light output will be (that is, the number of Lumens it is sending out). For example, at the closest throw distance it might be sending out 1900 Lumens, while at the farthest throw distance, it could be 1500 Lumens, around 20% less.

Contrast, the range between the blackest blacks and the whitest whites, has a very significant impact on overall picture quality, giving the image the 'pop' that we're all looking for. In general, the higher the contrast, the better the picture. The amount of Contrast we get with the Projector varies in the opposite way from Lumen output, so that Contrast is lowest at the shortest Throw Distance, and greatest at the longest throw.

If you don't have a mount installed yet for your Projector, we generally recommend installing it close to the minimum throw distance needed to fill your screen if this works within the overall design of your theater. This maximizes Lumen output while decreasing Contrast. But as we'll see below, we can easily compensate for that. 

Hopefully you have used the numbers we provide in the throw distance calculator to determine the minimum and maximum throw distance for your projector and screen.

2. Light Output:

The Projector can be set to 3 different levels of Laser Output: Low, Medium and High. Which setting is “best” will depend on the Throw Distance, along with the Screen's Size and Gain. The goal is to achieve the proper number of Nits for both SDR and HDR as we talked about above.

To determine the number of Nits you have requires the use of a Light Meter. You can use a Light Meter App on your SmartPhone, or purchase a Meter for this purpose. A great one for the money is the Dr. Meter which can be purchased on Amazon.

You will need to send a 100 IRE White Field image from the Projector. You can find test material like this on YouTube (for example, see this one), or on commercially available Test Pattern Discs like Disney WOW, Spears & Munsil, etc. Then place the Meter right at the screen, in the center, and facing directly toward the Projector's Lens. Set the Meter to read in Lux, and then just write down the measurement. To get the number of Nits, simply multiply this number by the Gain of your Screen, and divide by pi (3.14).

3. Aperture:

This is the opening through which the Projector sends its light, analogous to the iris of your eye, or a camera. With the Aperture wide open, the greatest amount of light comes through, but with the lowest amount of Contrast. As you close it down, the amount of light decreases, while the Contrast increases.

4. Dynamic Laser:

Enabling this feature allows the projector to automatically lower the Laser Output in the darker scenes of a given show or movie, deepening the Black Level. One of the key benefits of having a JVC Projector is having “inky blacks” which contributes to the amazing picture quality they have.

When the Laser Output is lowered, however, this also decreases the amount of light available for the brighter elements still on screen. To try and compensate for this, the Projector also does what is called “gamma manipulation” where it  boosts the brighter elements in the scene.

Picture Modes

Before we bring it all together, we need to talk a little bit about Picture Modes and how you will use them when you make the adjustments we suggest.

One really nice feature of the JVC Projectors is the ability to easily configure a Picture Mode, where you choose exactly what settings you want the Projector to use, for each type of content you will be viewing. This includes SDR, SDR 3D, HDR, and HLG.

The next 2 images show the main menus that you’ll use to set up a Picture Mode for each of thes Content Types.

This is the first menu that comes up when you hit the JVC Remote’s Menu button. For each Content Type that you select, it will show you the available Picture Modes. If SDR is selected, these would include Natural, Cinema, Film, and User 1-3. If HDR is selected, the options would be Frame Adapt HDR, HDR10, Pana_PQ, and User 4-6.

The settings in the menu above are a good starting point for SDR. For HDR10, we recommend Frame Adapt HDR. And then, for each of these, you will select the “More Settings” menu line, which will bring you to this next menu screen.

In this example, one of the User Picture Modes has been selected. Here you can select the Laser Power, Dynamic CTRL and Aperture settings we talked about above. There is also an option on the bottom where you can edit the name of the Picture Mode, such as SDR, HDR, 3D, etc.

Once this is done, and the Picture Modes configured for each Content Type, you can then have the Projector automatically switch to the appropriate Picture Mode, using this next menu screen.

For each Content Type, you just hit ‘Enter’ and you’ll be presented with the list of available Picture Modes. You then simply select the Picture Mode that you previously configured for that Content Type. The Projector then takes care of switching to the correct Picture Mode without your having to do anything further. We think this is a fantastic feature, which makes using the Projector so much easier and automatic.

Putting it All Together

The goal here is to have the right amount of brightness, with the greatest amount of Contrast, to provide the best possible picture. Once your Projector is Mounted, and your Screen installed, you can then make adjustments using your Projector's settings.

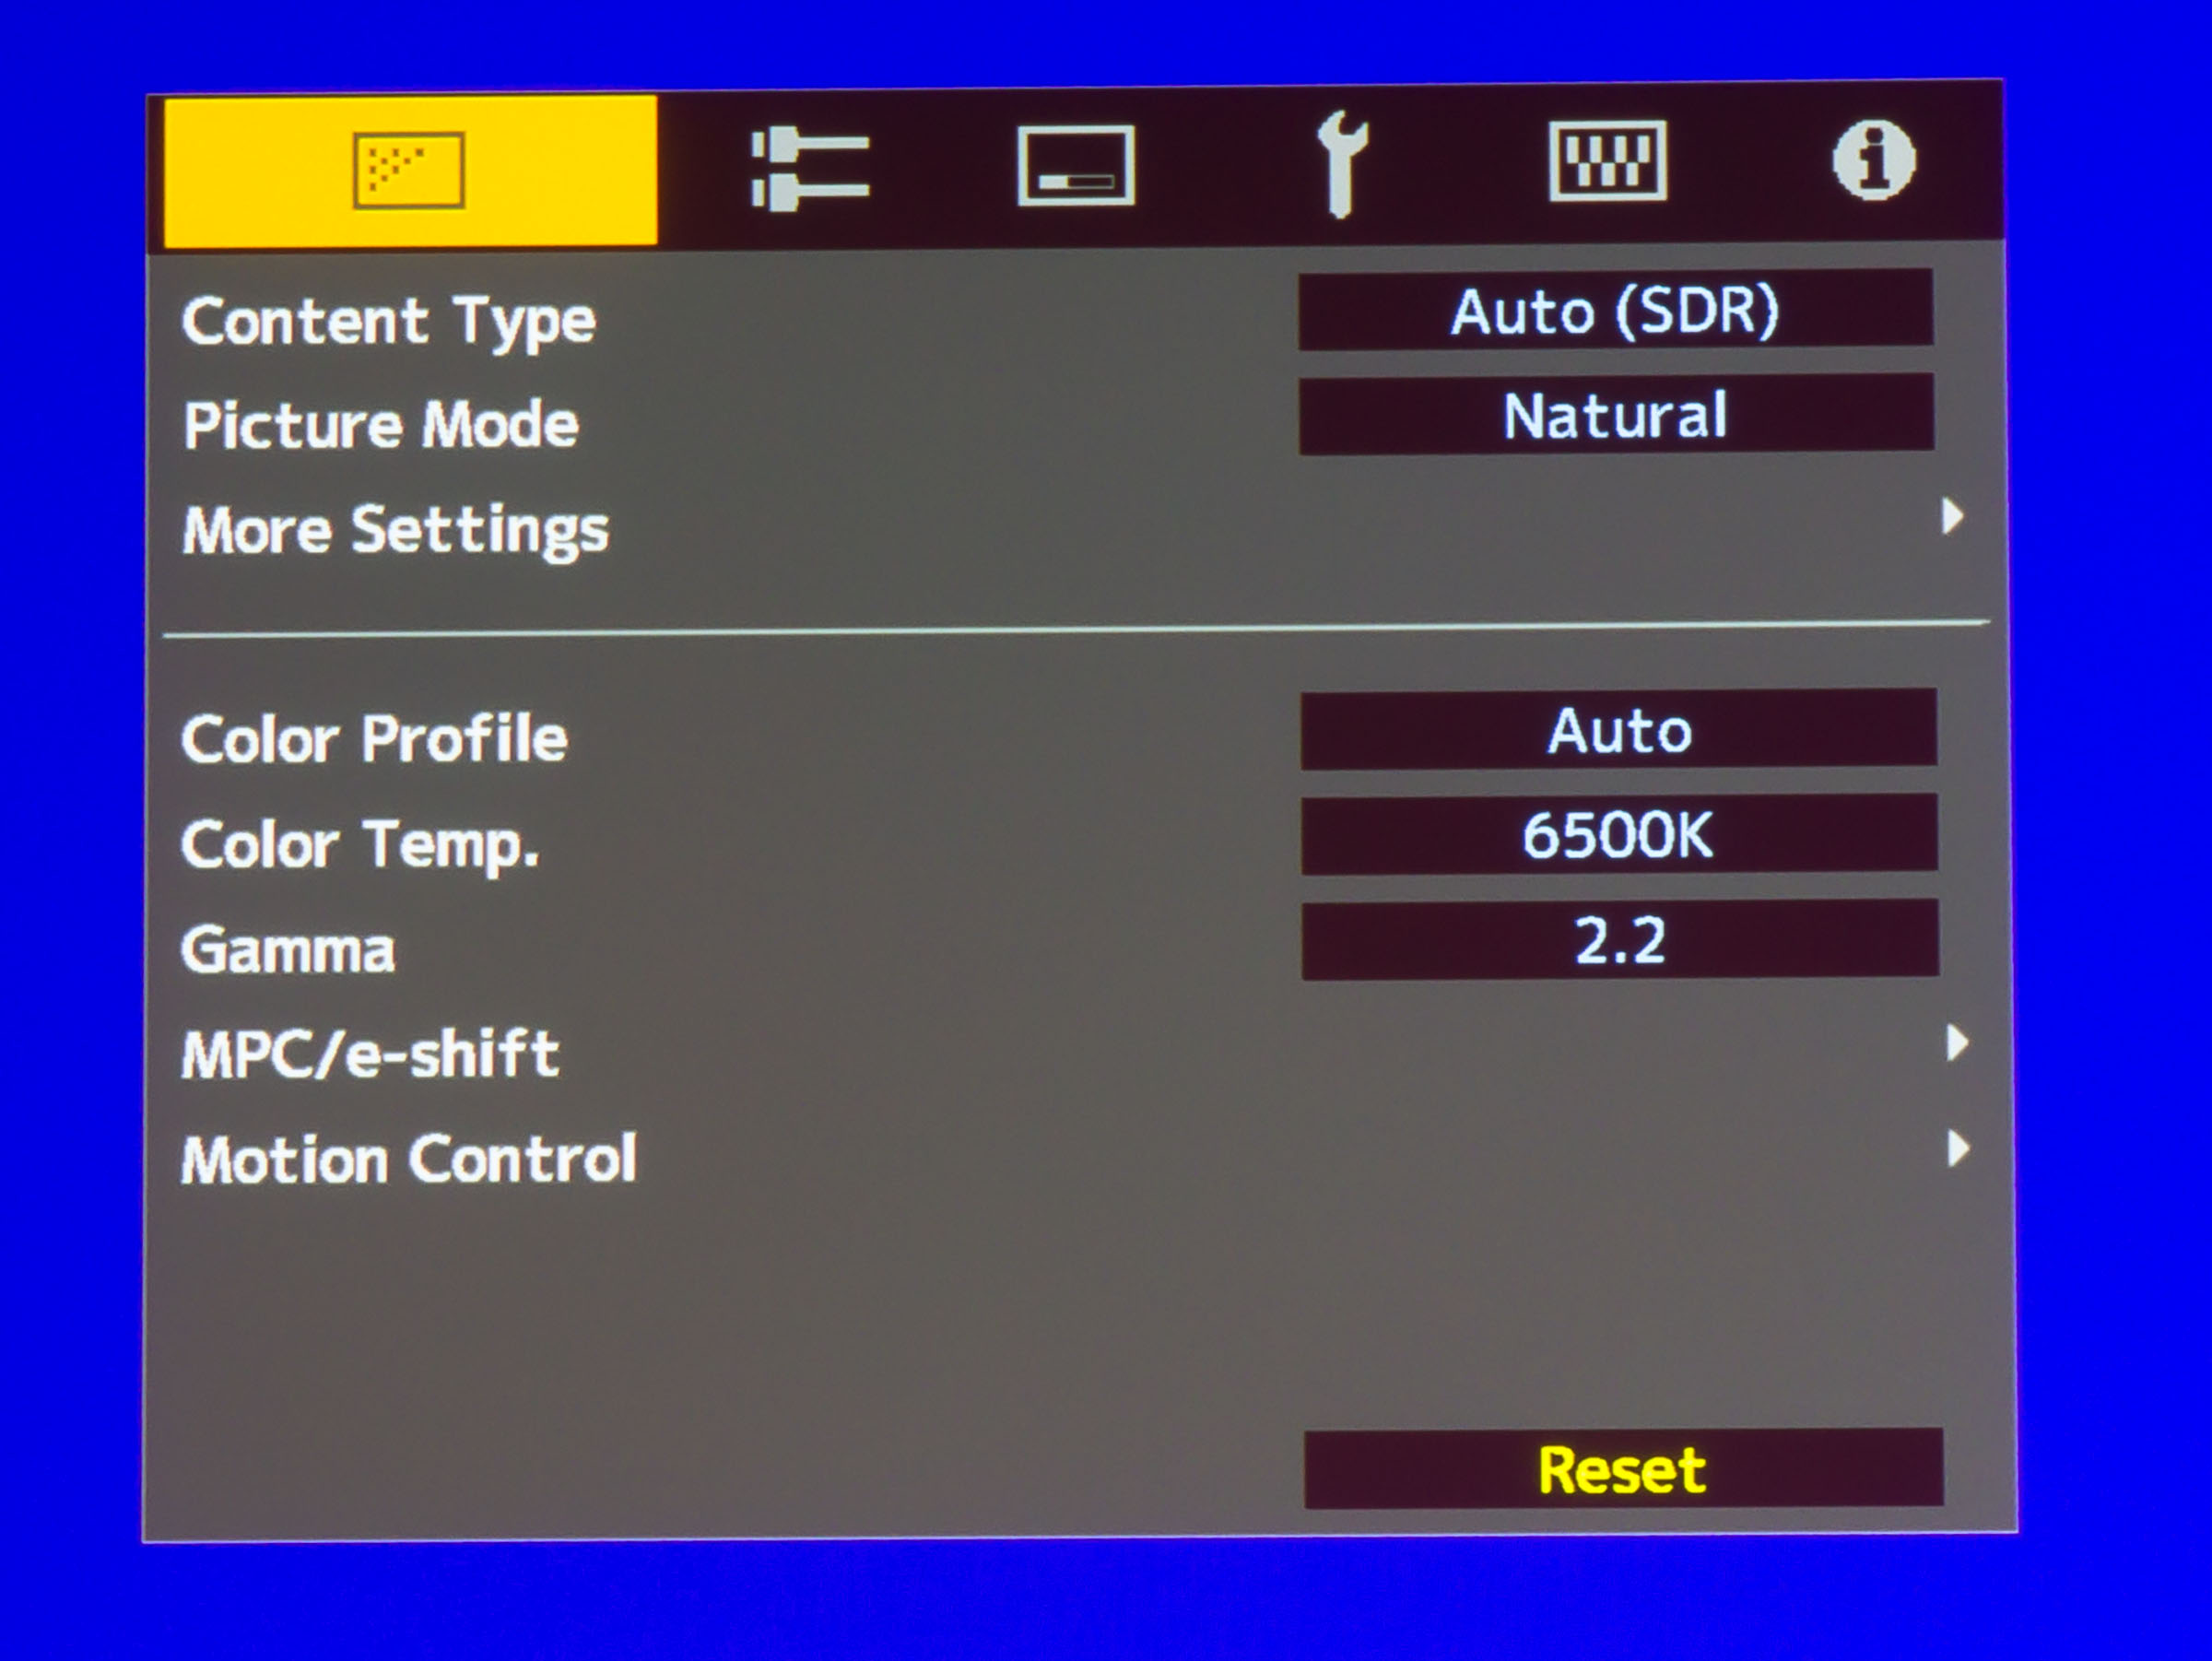
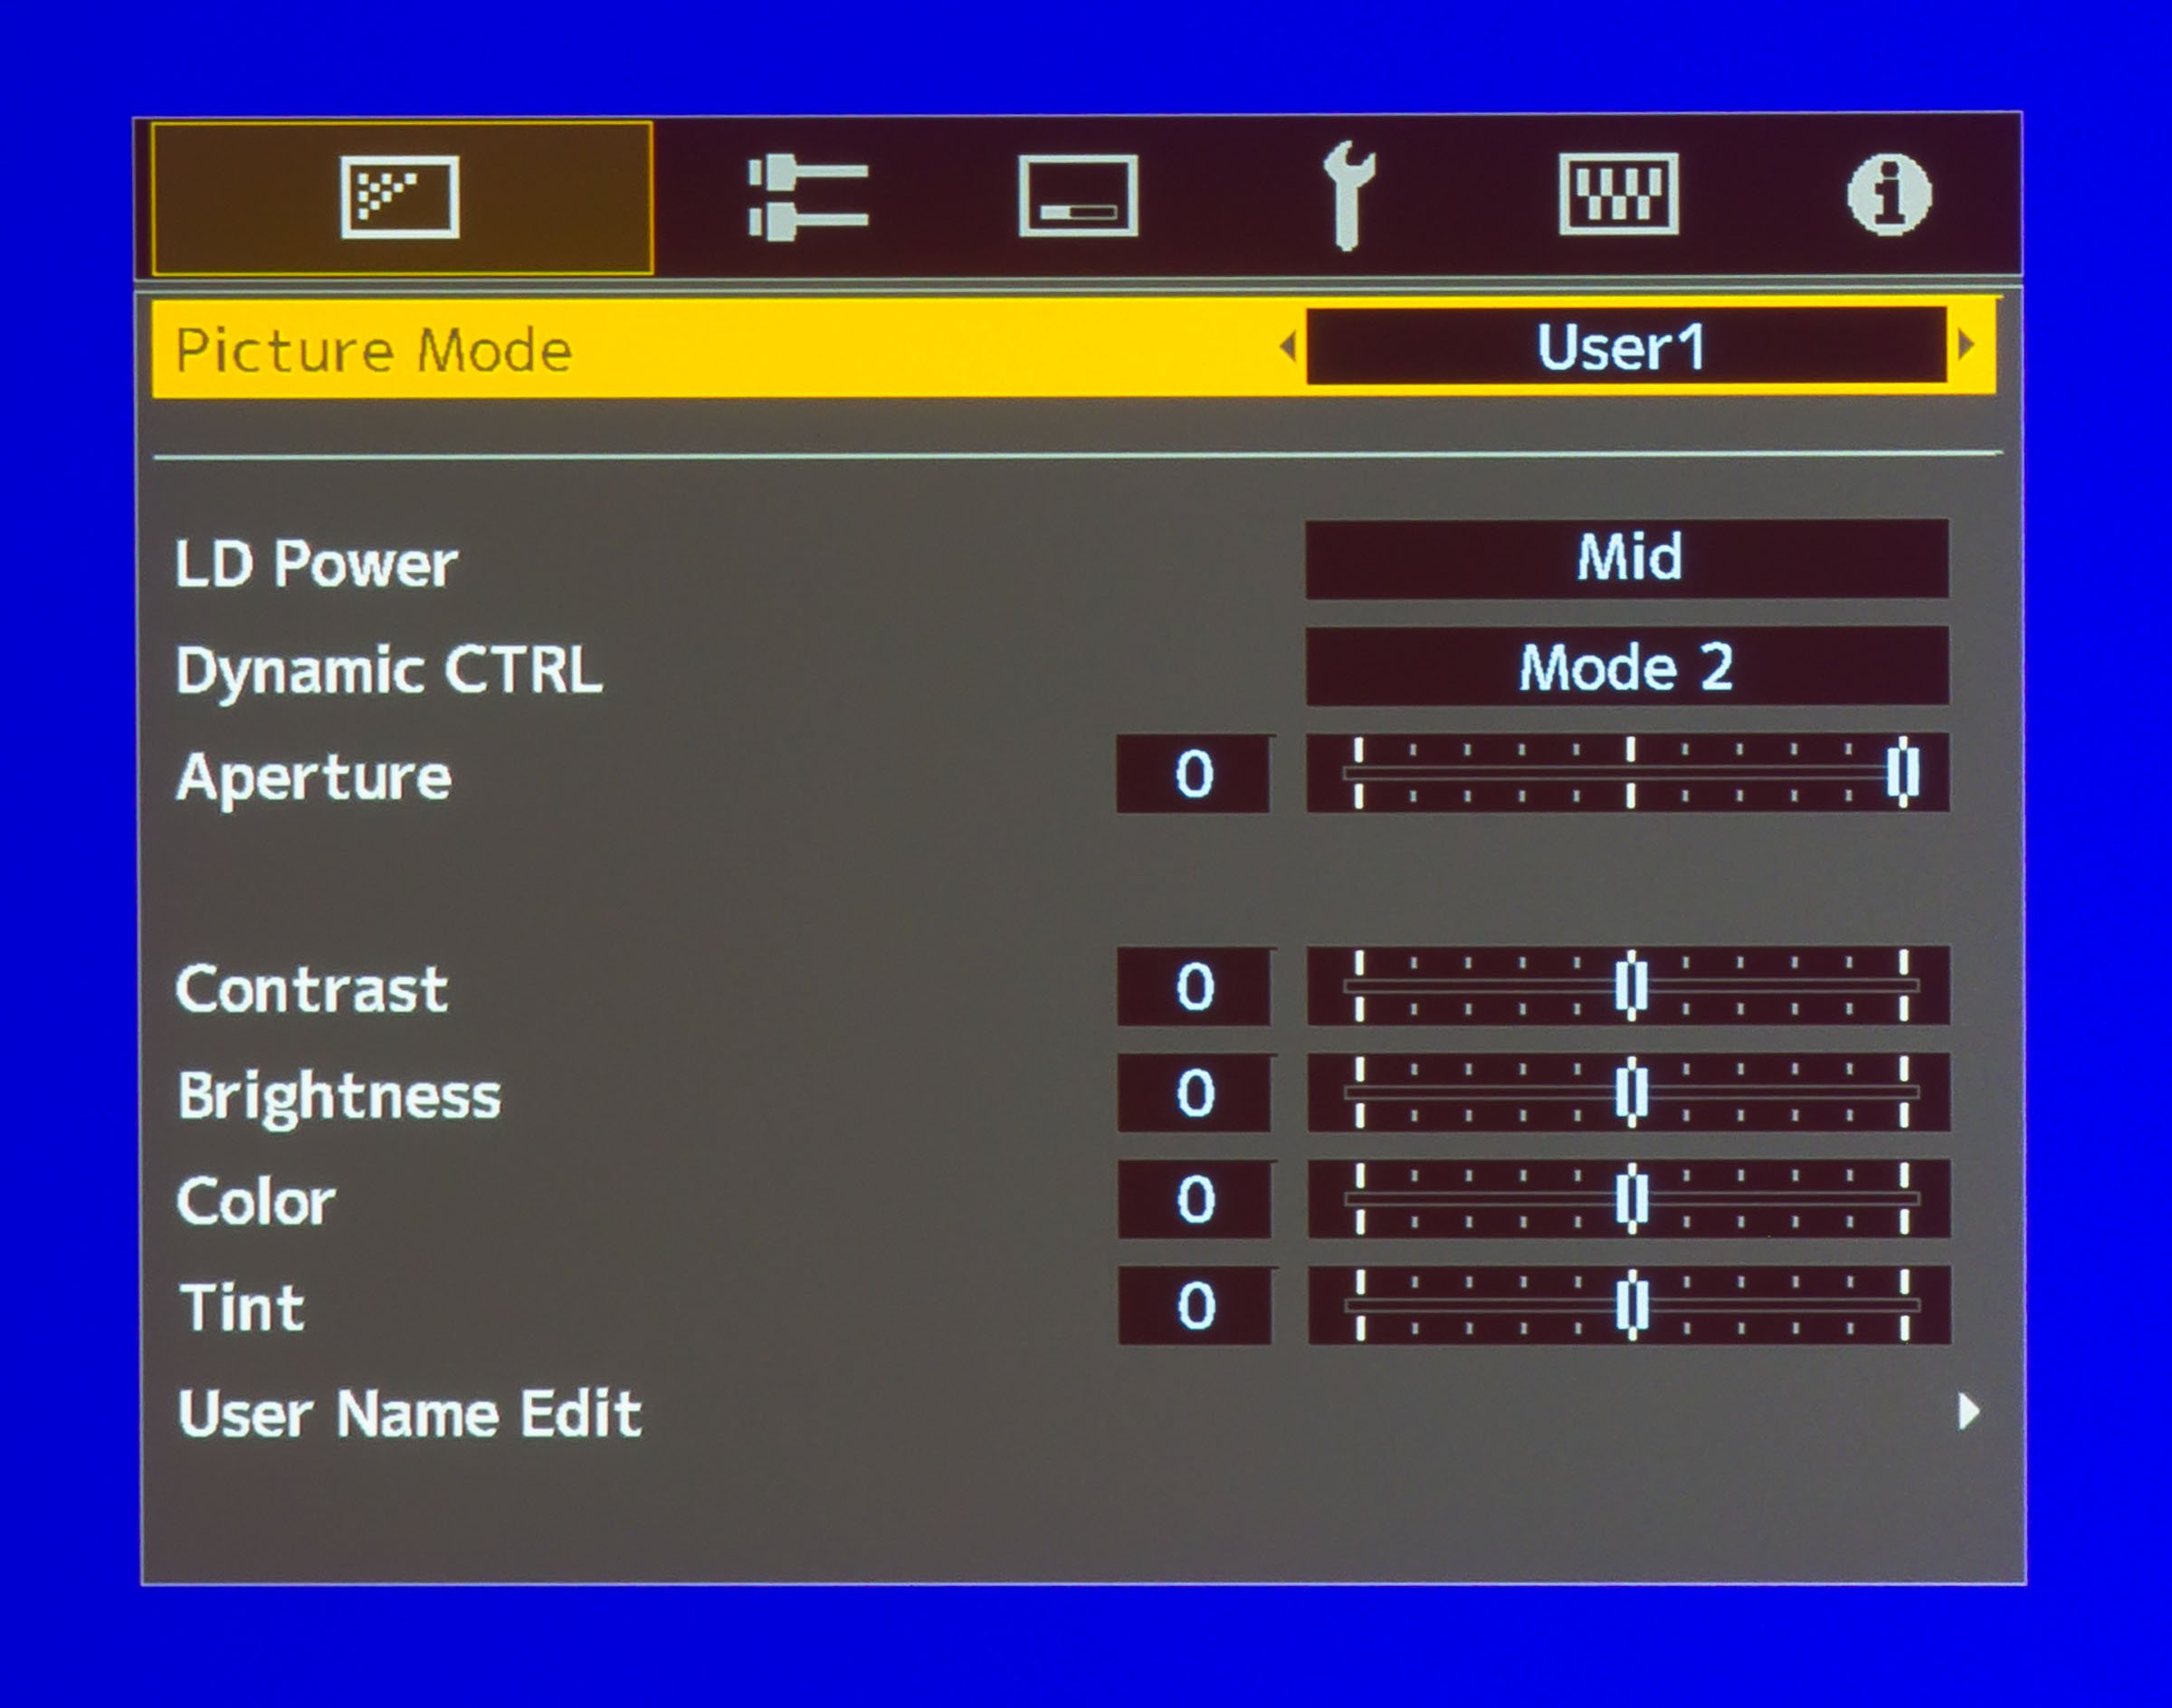
First, for SDR, put your Projector into the Picture Mode you'll be using for regular SDR content. Then project the 100 IRE White Field image. You can now measure the number of Nits for each of the Laser Modes (Low, Medium, High). You can make changes to the Laser level when the Picture Mode window is open, where you can also see the Aperture setting.

For example, if you measure 50 Nits with Low Laser, with the Aperture wide open (i.e. at 0), then you might assume this could be used without any changes. . But let's say you measure 70 Nits with Medium Laser, with the Iris wide open. You could then close the Aperture until you again read that same 50 Nits. You might then be at -6 for the Aperture, for example. You now have the same desired brightness as before, but with higher contrast because the Aperture is smaller, and therefore a better picture.

Similarly, if you measure 100 Nits with High Laser, you could then close down the Aperture even more until you get to 50 Nits. This might be -15 for example, which would produce even more Contrast, and an even better picture. It's also possible that even with the Aperture all the way closed, you would still be higher than 50 Nits. In this case, it would be best to just use Medium Laser.

Everytime you make a change, you’ll need to take the measurement with the light meter and do the math to convert the number to nits, but this exercise is well worth it if you want the best picture. 

You can then go through the same process using the Projector's HDR Picture Mode, aiming for a target of 100 Nits.

Lastly, regarding the Dynamic Laser ( “Dynamic CTRL” in the Menu), we recommend using Mode 1, which we find provides the best balance of maintaining the brightness of brighter elements, while also deepening the blacks in those same scenes. We find Mode 2 to be too “aggressive” such that the brighter elements lose too much brightness, and therefore reduces the overall visual impact.

By understanding and implementing the various installation and configuration techniques outlined above, you will be amazed at the brilliant, life-like, color-rich pictures of this line of JVC Projectors. And with the long life of the Laser, you’ll enjoy this for years to come.

A Word On HDR10

These Projectors offer Dynamic Tone Mapping which works extremely well with HDR10 content. We find the best results using the Picture Mode “Frame Adapt HDR”, and then using the Frame by frame setting.

Theater Optimizer

This is covered in Pages 41-42 in the manual. It provides the ability to input your screen size, aspect ratio, and gain, enabling the Projector’s Dynamic Tone Mapping to be customized to what will work best in your Theater.

With the Theater Optimizer turned On, we recommend setting the “HDR Level” to Auto. This will provide the best performance for most HDR10 content.

With the Theater Optimizer turned Off, HDR Level options include Auto, which generally works well, along with manual values from -2 to +2. If a particular movie you’re watching looks too bright or too dark, the HDR Level can be adjusted downward, or upward, respectively, to compensate.

But most of the time, Theater Optimizer On and HDR Level on Auto, will give you the best picture quality.

Gaming

If you want to enjoy video gaming on your NZ projector, we recommend you use one of the 9 presets to store a setting for gaming only, as for normal content the picture is better with the gaming mode off. However, this setting does reduce lag. This is found under the Picture menu, Motion Control, then Low Latency- turn this on but leave the other two motion settings off.

Fast Moving Sports

Some people like to try the motion reduction software which is also found under Motion Control, you can experiment with the settings under Motion Enhance and if you prefer them, store them under another preset.

JVC’s Special Auto Calibration Software

If you do want to take things a little further down the calibration route, you can download JVC’s free software here.

This software requires a Windows laptop and an aftermarket Datacolor SpyderX which will run you about $200. You will see that some SpyderX products are more expensive than others, but they only differ in terms of the software provided with it. The meter itself is exactly the same. So because you’ll be using the JVC software instead of the Datacolor software, you can get the least expensive version you can find.

You will also need a good tripod to attach the Spyder to that allows you to put it in the exact middle of your screen.

If you can do all this, it is automatic and you will just follow the steps. Be sure to remember to save the new settings to your projector when you are done. And the first time you do this, the software will automatically generate “INIT” files which are downloaded to your computer. It is very important for you to know where these are, and to back them up as well. These files are the only way to get back to your Projector’s original calibration state should something go awry with your own calibrations.

We appreciate your support of Audio Advice and hope these tips will help you get the best out of your new projector. If you have any questions, call 888.899.8776, chat with us, or stop by our award-winning showrooms. At Audio Advice, we've been designing and installing high-performance home theaters & smart home systems for our customers in North Carolina and the surrounding areas for decades. In fact, we've delivered more custom theaters than anyone in the Southeast! We are now offering Home Theater Design no matter where you live in the United States! If you are interested in a custom home theater or upgrading your current system, give us a call at 888.899.8776, chat with us, or stop by our award-winning showrooms. We can't wait to help you build your ultimate home theater!

FREE Interactive 3D Home Theater Design Tool

Enter your room dimensions, audio, and video preferences while it designs your theater in real-time. Receive optimal screen size, seating locations, speaker locations, and receive precise measurements for your room layout. Work with our system designers via chat, email, phone, or in-store for expert advice, product selections, and more.

MORE VIDEOS & REVIEWS

Wishlist
Copyright © 2024 Audio Advice. All rights reserved.