madVR Envy Pro MK3
Free Shipping On All Orders, No Minimums.
We offer free 2-day shipping on most products within the continental US.
Weekdays - Orders placed by 2pm EST ship same day. Orders placed after 2pm EST will ship the following business day.
Weekends - Orders placed on Saturday and Sunday will ship Monday.
Orders requiring motor freight delivery may take more than two business days. Once your order has shipped, you'll receive a shipping confirmation email with a tracking number for easy tracking.
Orders for Open Box products ship with free ground shipping within the continental United States.
Orders that contain items that are currently backordered, special order, or out of stock will ship complete once all items are in-stock unless otherwise requested.
If you need it faster, you will have the option of choosing a quicker shipping option when you checkout on the website.
At this time, we do not ship internationally and orders to Hawaii and Alaska may incur an additional shipping charge. Please contact us at 888.899.8776 or email support@audioadvice.com to confirm.
Rerouting and Address Changes
We cannot make ANY address changes once an order is placed. If you are unable to accept delivery of your package as ordered, we will need to cancel your order, return the package to sender and have you replace your order through our website.
Keep the Box
We suggest you keep the shipping box or boxes for at least 30 days. It is actually a great idea to keep boxes for audio products for the life of the product. Having the box and all packing will increase the trade-in value should you decide to move up and they are handy to have should you ever need to send the unit in for repair.
How To Receive a Motor Freight Order
The trucking company will contact you to schedule a convenient time to deliver the order. Please note that you must be present for delivery.
Visually inspect the box to make sure you see no signs of damage. If you notice any damage at all, take some pictures with your phone and make a note of them on the delivery receipt the driver will ask you to sign. If it is obvious that the product is damaged, please refuse the order and contact us immediately at 888.899.8776 or email support@audioadvice.com.
Open your box as soon as possible and inspect the product for damage and contact us if you find anything wrong.
FedEx Freight Service Comparison
| Feature / Service | Scheduled Curbside Delivery | White Glove Delivery |
|---|---|---|
| Scheduled delivery appointment | ✔ | ✔ |
| Delivery location | Ground level only (garage, front door, loading dock) | Room of choice, any floor |
| Delivery team | 1 person | 2 people |
| Placement inside home/business | ✘ | ✔ |
| Upstairs / downstairs delivery | ✘ | ✔ |
| Unpacking | ✘ | ✔ (upon request) |
| Packaging removal | ✘ | ✔ (upon request) |
| Assembly / installation | ✘ | ✘ |
| Old item removal | ✘ | ✘ |
At Audio Advice, we pride ourselves on customer satisfaction. We'll bend over backward to make sure you're 100% satisfied and we won't accept anything less. We offer 30-day hassle-free returns and personalized service from real, live people.
If an item doesn't meet your expectations, you may return or exchange it in its original condition and packaging within 30 days for a full refund, minus shipping fees. Items shipped back in like new condition through standard shipping carriers will incur a minimum $15 return shipping fee. If the items were initially shipped through free scheduled delivery via motor freight (commonly referred to as LTL), returning them will result in return shipping fees starting at $150. These items include but are not limited to, oversized items such as TVs, certain subwoofers, floorstanding speakers, furniture, and most items weighing over 75 pounds. Return fees will also apply for exchanges. We want to treat your system as if it is our own and want you to be completely satisfied with your purchase.
Please see the instructions below. We only accept returns for any product purchased directly from our website. If merchandise is not returned in its original condition or is missing packaging, manuals, accessories or other parts, or the resale value of the product has been impaired, a partial refund will be given and calculated on a case-by-case basis.
Non-Returnable Items
The following items cannot be returned or cancelled:
- Special/Custom Order Items
- Gift Cards
- In-ear headphones cannot be returned once the packaging has been opened due to personal hygiene reasons. Please contact our customer care team if you'd like help choosing.
-
Turntables With a Broken Stylus: All turntables ship out with the stylus intact. If you return a turntable or phono cartridge with a broken or missing stylus you will be subject to a return fee. Please be careful when setting up your turntable and contact us with any questions.
Is It Easy To Return An Item?
Yes, simply give us a call at 888.899.8776 or you can email our support team at support@audioadvice.com. Many times our team of experts can help figure out why the product might not be working like you expected and get things fixed over the phone, so don’t be surprised if we ask a few questions, we love troubleshooting!
If our tech help can not make you happy, we will email over a return shipping label with a Return Number.
Hopefully, you saved all of the original item’s box and packaging inserts. You will want to pack back up your return or exchange in the same way it came out of the original box. Once you have everything packaged correctly, tape the box on the top and bottom to assure it stays together. If Audio Advice shipped the item to you inside a second box, it's a good idea to use that same extra box to help prevent damage on its way back to us. To avoid it accidentally coming back to you, use a magic marker to cross out the old shipping label or just tear it off.
The return shipping label we send you will have our address on it, just make sure you take the box to the right shipper (UPS, FEDEX, or USPS) as per the label.
If you are close to one of our stores, please let us know if it is more convenient for you to return it to us directly. You will still need to get a return number by contacting us and shipping and/or restocking charges may apply.
When Will I See My Refund?
It usually takes around 7-14 days for the refund to show up on the payment method you used. We do inspect all returns for damage and accuracy of the item inside the box before issuing a refund. Some items may be subject to shipping and restocking fees.
Can I Exchange My Purchase For Something Different?
Sometimes those big speakers just don’t fit in the room or you might have bought a small subwoofer and later found out you’d love a bigger one. If you would like to make an exchange within 30 days of receiving your item, just give us a call at 888.899.8776 or email support@audioadvice.com and we will help work out the details. Additional shipping charges and return costs may apply.
How Do I Cancel An Order?
If the item has already shipped out or is a special order item, it is not possible to cancel the order. Please contact us at 888.899.8776 or email support@audioadvice.com to start the return process.
What If I Find Shipping Damage?
We need to know right away about any shipping damage. Please contact us at 888.899.8776 or email support@audioadvice.com within 48 hours of your delivery so we can get the ball rolling on making things right. It’s very helpful to take some pictures and email them to us if possible.
Can I Refuse A Shipment?
You can, but unless the item is damaged, shipping and restocking fees will be deducted from your refund. If your item arrives damaged and you are lucky enough to be there, snap some quick pics and refuse the order. Then contact us so we can get a replacement on the way.
What Happens If My Order Is Defective?
This is actually pretty rare, most consumer electronics work fine out of the box 99.9% of the time. We’d like for you to contact us first by calling 888.899.8776 or email support@audioadvice.com so we can help get to the bottom of things. If your item is indeed defective during the first 30 days, we can usually exchange it for a new, replacement unit.
What About Service After 30 Days?
Audio Advice has a great relationship with all of our brands and can help you with warranty service by the brand after our 30-day guarantee period. Even after the warranty expires, we can arrange for service by the brand on products purchased from Audio Advice. Just call 888.899.8776 or email support@audioadvice.com.
How Do You Determine A Restocking Fee?
You may not believe it, but sometimes we receive items back that were put in the box with zero packaging and are completely destroyed or are missing many of the pieces that came with the item. We also track serial numbers and will get back different serial numbers. We’ve even seen different items than what we shipped out be returned. However, it’s very important to package your return properly so that nothing goes missing or gets damaged in shipping, which will result in a restocking fee or even no refund at all. If a product is opened and the market value of the product is reduced, then a restocking fee may be applied to the cost of restocking and the reduced market value of the product. The bottom line is if you treat us fairly, we will do the same.
Audio Advice strives to provide industry-leading support and service while also maintaining the lowest prices available on products for our customers. We work hard with our vendors to bring our customers the best products at each price point. As a part of that process, we work with our vendors to provide the lowest pricing in our stores and on our website.
Our prices should always be the same as any other authorized dealer, including big-box retailers and major online retailers.
If you believe that you have found a lower advertised price from a legitimate authorized seller, call us and let us know so we can make sure we can correct any inadvertent error on our side. As a matter of policy, we update our prices automatically if a vendor changes its authorized pricing policies, so we generally have the best prices all the time. Increasingly, there are knock-off copies of products online, usually sold by non-authorized dealers.
Please be sure that the item meets the following conditions:
- The item is brand new, in stock, and available for purchase
- The item has the identical model number, color, etc as the item on our site.
- The seller is an authorized dealer
As always, our goal is to provide a terrific customer experience, including industry low prices. We appreciate your support.
Overview
Audio Advice is the world’s largest retailer of madVR Envy video processors and the leader in remote setup and calibration. Our team has completed more madVR installations than anyone in the U.S., giving us unmatched expertise in optimizing its performance. We recommend speaking with our specialists before placing your order to ensure seamless compatibility with your system and to establish a tailored calibration plan for the best possible results.
What is the Envy?
The Envy is a powerful Video Processor, dedicated to providing the best possible picture quality for high-end Cinema. Modern video images exist in the digital domain, and so must go through a wide variety of devices and processors to get from the original source to the screen where it is viewed. Video Processors are present in the players we use, a/v receivers, pre-pros, as well as the projector or other display device. These will vary in what they are able to do with the image, and more importantly, how well they do it. The Envy was designed to outperform them all, so let’s take a look at how it measures up.
madVR History
Many in the audiovisual world will be familiar with madVR, as its software is well respected, and has been used in home theater personal computers (HTPC) for more than a decade. This required building and maintaining a relatively high-end computer to handle some heavy-duty processing, and typically demanded quite a bit of technical expertise to tap its full potential.
In 2019, Mathias Rauen, the technical genius behind madVR, teamed up with Richard Litofsky, an entrepreneur with 30 years of experience building technologically oriented companies, to create madVR Labs, LLC. The goal was to take the capabilities of a madVR HTPC and transform it into a readily available and easy to set up product, which could be used by anybody, in any cinema environment. The Envy is the result, and it has been available since 2020.
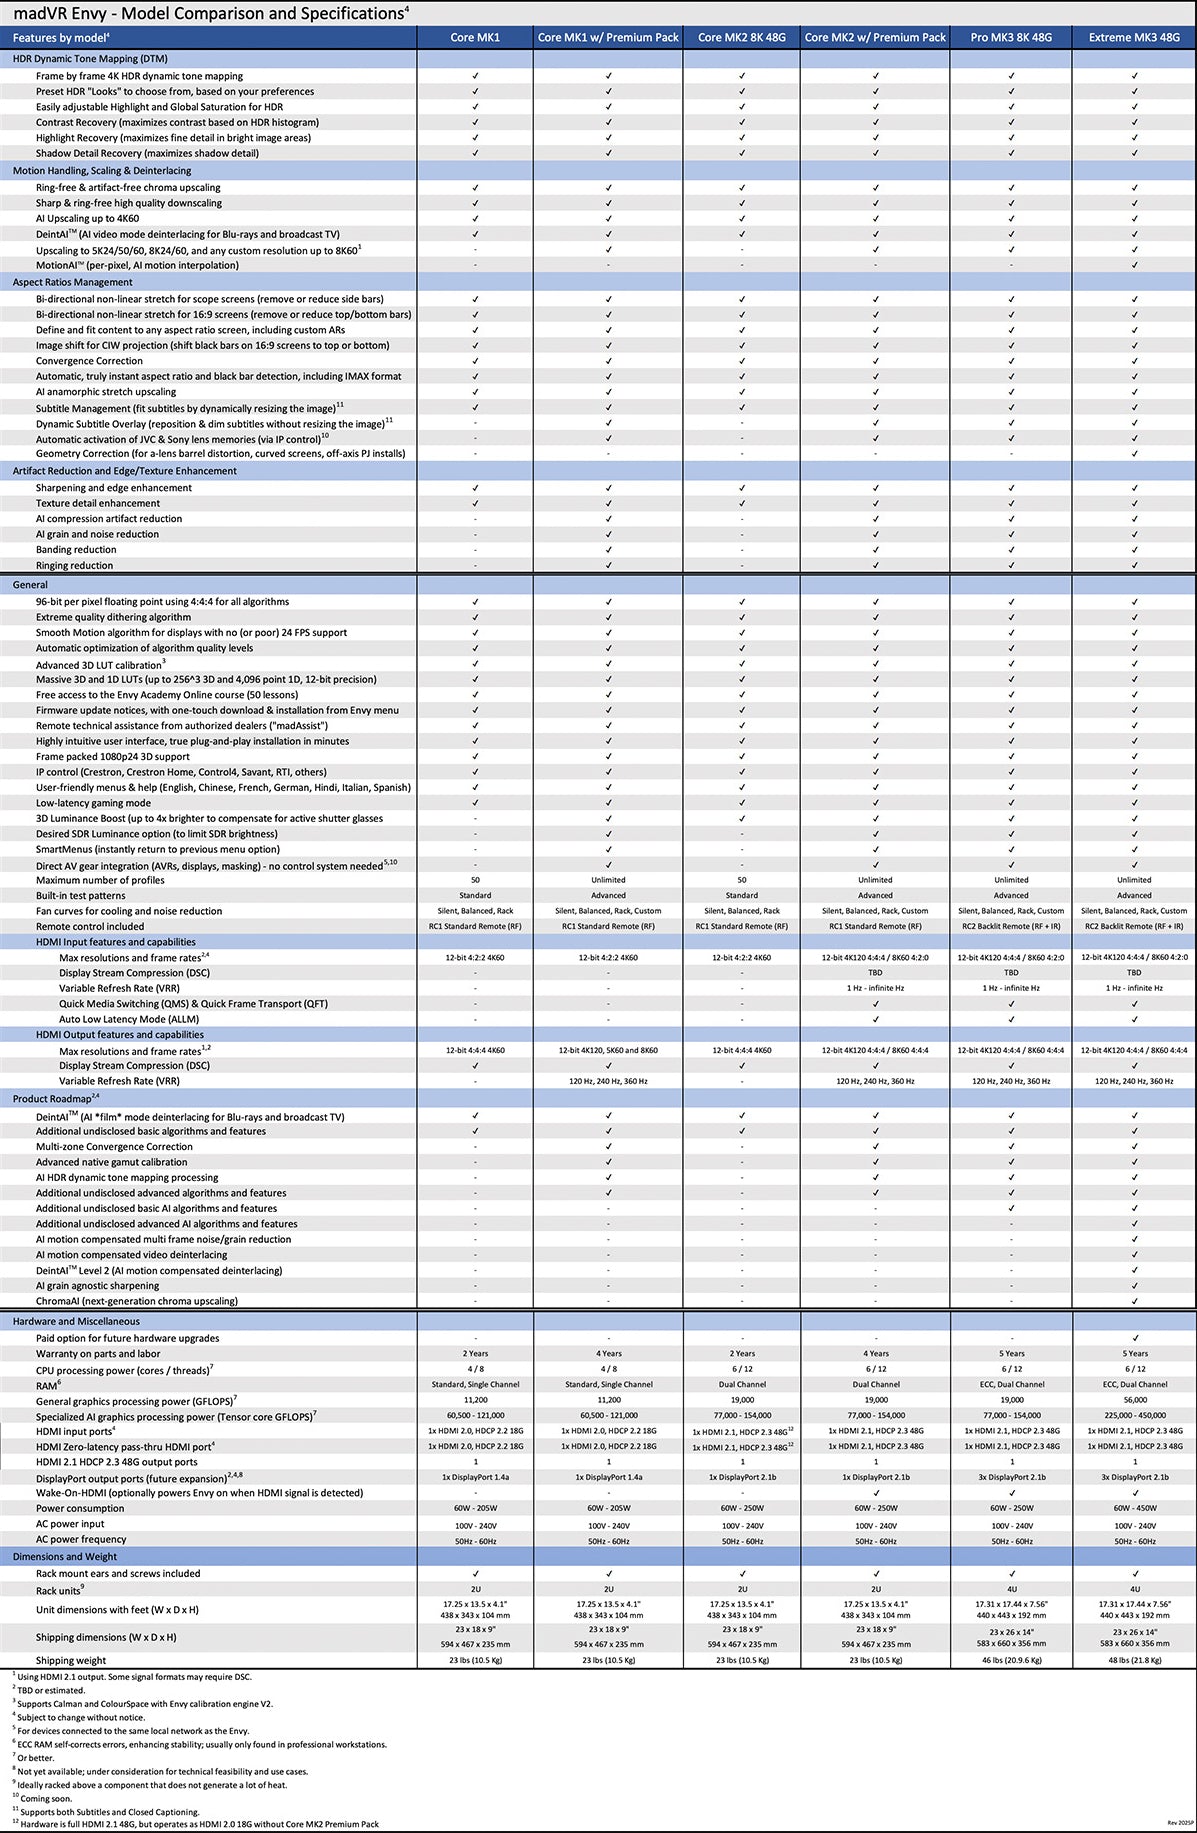
Introducing Envy MK3
madVR Labs has just announced the Envy MK3. The Envy Pro MK3 is powered by the Nvidia 5060 GPU, and will receive an upgraded GPU with triple-fan design for enhanced cooling efficiency and noise reduction.
One of the things that has really impressed us about MadVR is how much feedback they have sought to improve the product over time. They are constantly soliciting our feedback on functionality and software.
The results are that the new MK3 product will benefit from ECC-RAM, providing unparalleled reliability and stability, an upgraded motherboard, power supply, more than twice the RAM and SSD capacity as the MK1 models, along with the new Glacier X2 cooling system. This features three 140mm and two 120mm high-end static pressure fans, providing 50% more airflow. The net result is better performance and quieter operation, with noise now essentially inaudible from a couple of feet away when in Silent mode.
The Envy Pro MK3 features a custom-engineered all-aluminum 3mm case (5mm in the rear) with a 20mm front plate. The case's seamless one-piece design for the lid and side walls creates a modern, high-end look. The MK3 also features a 4 RU form factor, just like the MK2, a welcome reduction in size from the 5U required for the original Extreme MK1, making it more space-efficient in racks and more versatile for use in spaces with poor ventilation. Custom-made Rack Ears are now included with every Envy.
Envy models now include a 5-year warranty, which we consider quite exceptional in the world of high-end audiovisual gear. This is a strong indication of madVR’s confidence in the overall quality of the new MK3 design. We would like to see other manufacturers offer similar protection!
madVR Envy MK3 Features
Dynamic Tone Mapping (DTM) for HDR Content
The latest and most exciting development in home theater is the production of shows and movies with 4K Resolution, High Dynamic Range (HDR), and Wide Color Gamut (WCG). This can create an unprecedented level of realism and visual impact when done right, but there are significant challenges to achieving this in our homes.
Specifically, most HDR mastering is based on having a very high degree of brightness available on the display device – 1,000 nits, or in some cases, up to 10,000 nits. The best current televisions can get between 600 and 1,000 nits, sometimes higher, while the average is about 450 nits. And when we look at projectors, with a reasonably large screen size, they're generally in the 50 to 150 nit range.
As a result, in order to display HDR in home theaters where the brightness is quite limited, the original signal must be “tone mapped” to the range that is actually available. Initial efforts used “static” tone mapping, where a single map was used for any and all HDR content, but it really didn’t work well.
The Envy is one of very few devices that uses “dynamic” tone mapping. Here, each and every frame is independently analyzed, and sophisticated algorithms are used to produce the best looking image. The Envy allows you to input the actual Nits available on your screen, which it then uses to customize its output for your particular theater.
This makes a huge difference, and it does a superb job of creating the visual impact made possible by HDR. Before adding the Envy to our system, we frequently encountered scenes that were either too dark, others too bright, or areas where whites were clipped or blacks were crushed. The Envy has beautifully handled everything we’ve thrown at it, and we’ve been able to just sit back and enjoy the show!
The most recent firmware provides 5 selectable “looks” to the dynamic tone mapping, which along with other options available, provides the ability to fully ‘tweak’ the image to look its best in your own theater.


Harry Potter scene with the Projector’s DTM

Harry Potter scene with the madVR Envy’s DTM
Aspect Ratio Management
The movies and shows we enjoy can vary quite a bit in their Aspect Ratio – from the HDTV standard of 16:9, to 2.00:1 often used by Netflix, all the way to 2.40:1 for most motion pictures. This makes things difficult for any display device, and very often the picture gets compromised as a result.
If you’re using a 16:9 screen, and watching a 2.40:1 movie, there are letterbox bars at the top and bottom, which can be visually distracting. The Envy provides an option to automatically move the entire image either up or down, eliminating one of those bars, which reduces this distraction.
Widescreen Explained: What’s with the Black Bars?
If you’re using a Scope Screen (where the Aspect Ratio is between 2.35:1 and 2.40:1), the Envy will automatically detect the incoming aspect ratio, and scale it so that it always fills the full height of your screen, and as much of the width as the aspect ratio allows. This is a huge benefit. Before adding the Envy, we would have to use different lens memory settings for each and every aspect ratio, which physically zooms the lens, shifts the image, and refocuses the picture. This usually takes at least 10-20 seconds, and because it relies on physical motors, the precision isn’t exact and tends to drift over time, requiring additional manual adjustments. But with the Envy, it happens instantly and automatically, and is always precise.
This feature really comes in handy when watching movies where the aspect ratio changes during the same movie – Christopher Nolan’s movies in particular use this a lot. We watched Tenet, where the Aspect Ratio varied between 16:9 and 2.20:1, and these changes were automatically and instantly detected, so that the movie optimally fills the screen from start to finish.
And perhaps even more importantly, if you’re watching a 2.40:1 movie, zoomed to fill your screen’s width, and you hit the player’s Pause button, to fast forward, find a time-stamp, or to select a different scene to watch, those On Screen Display elements are typically in a 16:9 format. Without the Envy, these can’t be seen because they would ‘spill’ over onto the screen’s frame and the wall behind the screen. But with the Envy, they are instantly recognized, and the image is automatically rescaled so that all On Screen Display elements are always visible. This was needed basically every time we watched a movie, and was incredibly useful.
Non Linear Stretch
Whenever there is a difference between the aspect ratio of what is being watched and that of the screen where it is being displayed, there will be black bars present. When watching 16:9 content on a 2.40:1 screen, there will be ‘pillarbox’ bars on the sides. When watching 2.40:1 content on a 16:9 screen, there will be ‘letterbox’ bars on the top and bottom. In both situations, there is unused screen space, and many want an option to fill their screen, regardless of the Aspect Ratio.
The Envy provides a very easy way to reduce or eliminate the black bars in either of these situations. It provides a well-designed graphical interface where you can make the adjustments and see the results in real time. You can configure this for any aspect ratio you want, and the settings will be automatically applied.
The image can be partially cropped, which will increase the image size and reduce the black bars, with no distortion of the content’s geometry. This can be combined with stretching of selected areas of the content, along with compression of other areas. The result is a larger, more immersive image, with no black bars or unused space on the screen.
This is a personal choice, however, as some people prefer not to alter the original image in any way. But we do like the fact that the Envy provides the choice to the theater owner, to display the picture according to their personal preferences.

Subtitles
We often find it helpful to turn on subtitles, and when watching 2.40:1 content on a 2.40:1 screen, they are often partially or completely cropped out, because they’re in the black bar area usually below the screen. The Envy provides the ability to fix this, and the result is that the subtitles can be completely seen within a narrow bar at the bottom, with no bars at the top or sides. This is a huge benefit, and it works quite well. And even better, it does this automatically, needing no button pushes!


What you see without the Envy’s Subtitle Management

What you now see after turning on the Envy’s Subtitle Management
Dynamic Subtitle Overlay
An upcoming feature, called Dynamic Subtitle Overlay (DSO), seamlessly repositions subtitles into the active image with options to reduce subtitle brightness and size, and even adapts subtitle color to match the scene for harmonious integration.
We were able to preview this new feature at Audio Advice Live 2025, and we were incredibly impressed by its ability to minimize the distraction typically associated with standard black bar subtitles, while preserving crisp readability.
We believe Dynamic Subtitle Overlay will be a game-changer for those who prefer subtitles, and look forward to its public release.
Upscaling
If you’re watching regular HD content (1920x1080 pixels) with a 4k Projector (3840x2160 pixels), the image must be ‘upscaled’ to be viewed correctly. This can take place in the player, the AVR, pre-pro, or the projector. These devices can get the basic job done, but having limited processing power, the results are often not optimal.
The Envy has a huge amount of processing power available with its hardware, and along with its sophisticated proprietary algorithms to handle the upscaling, HD content often appears just as sharp and detailed as if it were 4k to begin with.
Image Enhancement
The Envy provides an array of settings to further improve the image. This includes options for sharpness, edge enhancement, reduction of grain, compression artifacts, and mosquito noise, as well as other tools. We find that adding just a little sharpening to upscaled HD material provides a significant improvement in image quality. And a little noise reduction makes watching older, grainier movies more enjoyable.

Anamorphic Stretch
Many people use Anamorphic Lenses to further improve image quality when using Scope Screens. Projectors typically have 2 Anamorphic Modes of processing available – one for 16:9 content, and the other for 2.40:1 content – with no ‘in-between’ options. This creates major problems for seeing full menus and other on screen Display elements, as well as subtitles, or when watching shows with aspect ratios other than 16:9 and 2.40:1.
The Envy is designed to handle these automatically and optimally, and it lives up to its claims. Regardless of the aspect ratio of what you watch, the Envy scales it automatically, and it looks great. It basically provides an unlimited number of anamorphic modes, which no projector could possibly duplicate.
3D LUT
The capability to have your system professionally calibrated, using software such as ColourSpace and Calman, is built into the Envy, supporting 256-point LUTs. This provides a powerful way to get the most accurate image possible in your Theater.
Operation
Setup
Given the Envy’s sophistication, with all the power and complexity ‘under the hood,’ the initial Setup is surprisingly quick and straightforward. Physical connection is simple – plug the HDMI cable from your AVR or Pre-Pro into the Envy’s Input, and the cable to your projector into its Output. A Quick Start Guide is provided to walk you through the basic settings, which only takes 5-10 minutes or so. The Envy’s default settings provide excellent results for most Theaters, so there’s no need for much technical knowledge to get up and running.
Menu System
The Envy Menu system has on-screen, context-sensitive help, which explains what any given setting does, to help you decide what choice is best for your theater. And even better, if questions arise, we, or even madVR staff themselves, can establish a remote connection to your Envy and walk through the Settings, as if we are in the room with you, and quickly fine-tune your setup.
While the basic setup and configuration is quick and easy, the Envy does provide a wealth of options for the user who prefers to ‘geek out’ and fully customize their setup in all the detail they want. One of the things we really liked was how easy it was to try out new settings without changing the defaults. We’ve used complex electronics in the past without this type of design, and have seen how difficult it can be to get back to where you started after making a variety of settings changes.
To accomplish this, it uses “Active”, “Temporary”, and “Base” designations for all the Envy’s settings. When you start making changes, they are assigned as “Temporary,” so that once you’re done with that viewing session, all of these values will automatically reset to their default (or “Base”) values. And once you decide which settings you want to be ‘permanent’, this is easily done by assigning that as the “Base” value with a simple button press. Honestly, most customers don’t even touch this stuff and let us handle it for them. But for those who are really into it, the Envy really makes customization easy.
Profiles
This is an ingenious concept developed by madVR, where you can ‘group’ a collection of any settings available in the Envy, in a ‘Profile,’ to be used together whenever you want. For example, we found we wanted different Envy settings to be used depending on whether we were watching with a Roku vs a Blu-ray Player. With the Roku, we wanted certain Subtitle settings to be used, which were different when watching with our Blu-ray Player. We were able to use the Envy’s built-in ‘source’ profiles, and assign whatever setting we wanted to be used whenever that profile was activated.
If you want to use the Envy with different Displays (e.g. a TV as well as a Projector), you can take advantage of its Display Profiles to configure optimal settings for each device.
You can also create Custom Profiles of your choosing, limited only by your imagination in putting these to use. For example, when evaluating the different DTM “Looks” we created profiles for these to provide instant access, which made comparisons much easier to do.
madVR has provided an Introduction to Profiles, and a Profiles User Guide to help you understand how profiles work. But honestly, this is harder to explain in words than it is to use in practice. Once the profile concept ‘clicked’ in our minds, we saw how powerful it was, how easily it could be implemented, and how we could quickly configure the Envy to use optimal settings for any situation. The more and more we have implemented, the better we’ve gotten at setting these up for clients where they don’t even need to understand the details–we just make it work in the background for them.

Control
The Envy comes with its own Remote, which can be configured to use either IR or RF. One of our few pet peeves with the original Envy was that the remote was not backlit. So power users who will make more frequent use of the remote can now enjoy its sleek design, great feel in the hand, and additional buttons to program and use, in addition to it being backlit.
madVR has released drivers to allow integration with a variety of automation systems, including Control4, Crestron, Savant, and RTI, which can further enhance the Envy’s ease of use. We have used the Control4 driver in many theaters, and have found it to be well thought out and easy to program. As an example, we combined Control4 Automation with the Envy’s Profile System, so that whether we used the Roku or Blu-ray Player, the correct Envy Profile was automatically activated.
But our favorite use was with the vertical masking for our scope screen. Control4 gets the Aspect Ratio from the Envy and then sends a command to the masking system to move to the correct position for whatever we were watching. We were pretty impressed with how well this worked!
Firmware Updates
As anyone who has had to deal with Firmware updates for any electronic device can attest, while great in concept, they can provide a mixed experience. For one thing, the update process itself can be cumbersome, often requiring a download to a USB stick, plugging it into the device, and then hoping it is recognized. Or sometimes specialized cables are needed to establish a connection. And once updated, it’s not unusual to have some things work better, while other features get broken, making us regret having done the update.
The Envy avoids all of these problems. The update process itself uses the Envy’s ethernet connection and takes less than 30 seconds to complete. But more importantly, if for whatever reason you want to revert to a previous Firmware version, this can easily be done in those same 30 seconds. Successfully reverting to an older Firmware is almost unheard of in this type of device, and is a feature we would like to see used in more electronic devices.

Conclusions
We have been very impressed with the performance of the Envy in all of the theaters we have done. It provides not only superb picture quality, but improves the ease of use dramatically. This can be very important when family members want to watch something on their own!
Obviously, we are extremely impressed with the MadVR Envy - so what’s not to like about it? Well first, it isn't inexpensive. If you want the best theater experience, we think it is great to add an Envy to any setup. However, it is going to be out of budget for some. The good news is that with the launch of the new Envy Core MK2, madVR now offers an option for those on a tighter budget to still add an Envy to their system.
Second, the incredible processing it performs takes time. The Envy adds some delay in the video signal. This means that you may need to add audio delay in your audio receiver or processor. Fortunately, this is not very hard. We have produced a YouTube video that our team and DIY customers use to nail lip sync delay.
How To Perfectly Set Lip Sync Calibration In Your Home Theater
As one of the largest MadVR dealers in the world, we’ve seen pretty much every permutation of projectors, receivers, and room setup. Even our customers who have vacation homes in remote locations have been able to easily plug in their new Envys and have us remotely set them up for them. Every single customer so far has raved about it, which to us is the ultimate sign of success.
Our madVR experts at Audio Advice would be happy to answer detailed questions for you. Our team just loves this type of high performance product and enjoys helping people find the right solutions for their home theaters.
At Audio Advice, we've been designing and installing high-performance home theaters & smart home systems for our customers in North Carolina and the surrounding areas for decades. In fact, we've delivered more custom theaters than anyone in the Southeast! We are now offering Home Theater Design no matter where you live in the United States! If you are interested in a custom home theater or upgrading your current system, give us a call at 888.899.8776, chat with us , or stop by our award-winning showrooms. We can't wait to help you build your ultimate home theater!

Details & Specs