EPSON LS500 UST 4K Laser Projector Tips & Tricks


Step 2
Fold one of the larger flaps on one side of the jig and its tab up.

Step 3
Fold the smaller flab and its tab up, and then insert the tab into the pre-cut notch.

Step 4
Repeat these steps on the other side of the jig, and position the jig with the “Do not discard” label right side up.

Step 1
Place the jig against the wall and align the jig’s center to the expected center of your screen.


Step 5
Align the projector’s center with the expected center of your screen.

Step 9
Using a carpenters level, verify the top screw and bottom screw lines are level across the entire projected image. If they are not level, rotate the projector slightly or adjust the projector feet until the lines are level.


Step 11
Verify the height value displayed in the projected image.
.jpg?v=1728319766741)
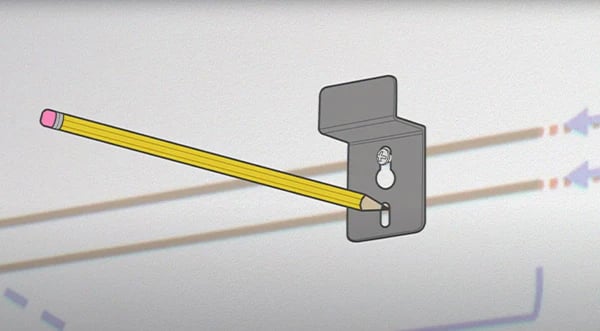
Step 1
Drill a hole into the top screw line on the upper left side of the projected image.

Step 2
If you are attaching the wall brackets to studs, place the hole you are drilling where the line intersects at the center of a stud — otherwise place the hole anywhere on the line.
(NOTE: If possible, place the hole in the green area of the “Optimal bracket location.”).

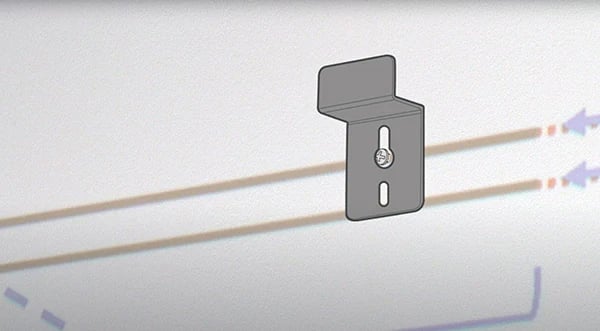
Step 3
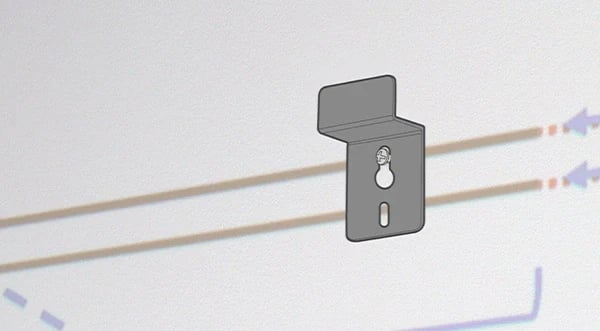
At this point, insert one of the mounting screws into the hole you drilled, and then hang a wall mounting bracket onto it but do not tighten the screw all the way.

Step 6
Repeat step 5 when you install the bracket on the upper right side and the bottom of the projected image.

Step 2
Place the metal frames onto the transparent sheet forming a rectangle with the screw holes facing up.

Step 3
Slide the L-brackets into the slots of one of the short frame pieces. Then connect the short frame pieces to the long frame pieces.

Step 4
Use the 16 short silver-colored M5 screws provided to join the frame pieces together, and screw 4 screws onto each corner.


Step 2
If the image is not aligned, slightly adjust the position of the projector as needed until the projected image is aligned with the frame.

Step 1
Remove the screen material from the tube and unroll it onto the transparent sheet. (NOTE: Make sure the side of the screen with the “DOWNSIDE” label facing up is closest to the wall it will hang on after it is unrolled.)

Step 2
Remove the frame from the wall brackets and center it on top of the screen material with the screw holes facing up.

Step 3
Fold the screen material over the frame to check the alignment. (NOTE: The screen edges should align with the frame, and the screw holes should not be covered by the screen material.)

Step 4
Insert one of the provided tension springs through the hole closest to the corner of the screen material.

Step 6
Repeat step 5 for the other hole closest to the corner. (NOTE: You can touch the screen material near the holes, but be careful not to touch the screen material on the other side of the frame or you could risk damaging the screen.)

Step 7
Continue repeating step 5 for the springs in the opposite corner, and then repeat step 5 again for the two remaining corners.

Step 8
Attach the centers of the long sides of the screen, and then attach the centers of the short sides of the screen.


Step 10
With all the tension springs attached, the next step is to attach each black trim frame edge to all sides of the frame. These slip right over each side of the frame and screen material and then screw onto the frame at each corner.

Step 11
Attach the black trim frame edges with the screw holes facing up, securing the connection with a corner guard. (NOTE: One of the short frame edges has the EPSON logo on it. Install that frame edge onto the side of the screen with the “DOWNSIDE” label.)

Step 12
Using the long black M5 screws, insert 2 screws at each corner, holding it all together while you tighten the screws.

Step 13
Insert one of the provided angle adjustment screws at the bottom edge of the frame closest to the DOWNSIDE label.


Step 1
With a helper, carefully carry the screen to the wall with the DOWNSIDE label at the bottom and lean the screen against the wall at a 15-degree angle with the DOWNSIDE label facing the wall. (NOTE: If you install the screen upside down, the image quality will be affected.)

Step 2
With a helper, lift the screen while maintaining the 15-degree angle and hook the wall brackets into the grooves at the top of the screen and then lower the screen onto the brackets, carefully resting the bottom of the screen against the wall. (NOTE: The bottom brackets should touch the inside of the frame and hold it against the wall.)

Step 3
If the projected image falls outside of the projected imaged range, adjust the screen left or right as needed.

Step 4
If the screen is not vertically straight, turn the angle adjustment screws as needed until it is straight.