The Projector then takes care of switching to the correct Picture Mode without your having to do anything further. We think this is a fantastic feature, which makes using the Projector so much easier and more automatic.
Congratulations! Your projector is set up and ready to enjoy!
Optional Expert Setup
If you have followed all of the steps above, you should be happily enjoying your projector. This next optional section is designed for experts or enthusiasts who want to try to eke out everything you can to achieve the most accurate picture possible and is one of the key steps that professional calibrators follow when setting up a projector. This section is broken into the theory section of what you are doing and then an application section walking you through exactly what to do.
Theory Section: Elements that Affect Maximum Light Output and Maximal Contrast
Picture Optimization in your Projector environment is impacted by the right combination of brightness and contrast. The variables listed below are the ones that can be adjusted to find the right balance of light output and contrast. They are:
- Throw Distance
- Laser Output
- Iris Aperture
- Dynamic Laser
Note: you will need a light meter (Amazon sells an inexpensive one) to measure brightness.
Definition: brightness on the screen is usually measured in terms of Nits or Foot Lamberts (fL). This is a specific amount of light in a defined area of screen. People do differ in terms of how bright an image they prefer, but there is general agreement that having around 50 Nits (15 fL) for SDR (Standard Dynamic Range) content, and over 80 Nits (30 fL) for HDR (High Dynamic Range) content, works very well for most Home Theaters.
And bear in mind you may prefer a brighter image due to your own personal tastes, so feel free to shoot for higher numbers if the result looks more visually pleasing to your eyes in your room.
In the section below we will go over the theory behind each of these variables. If you do not care to understand the “why” you can just skip to the Putting it all together section for the “how.”
1. Throw Distance:
The closer your Projector is to the Screen, the greater its measured light level at the screen will be (that is, the amount of Lumens hitting the screen). For example, at the closest throw distance it might be measure 2200 Lumens, while at the farthest throw distance, it could measure 1320 Lumens, around 40% less.
Contrast is the range between the blackest blacks and the whitest whites. Contrast has a very significant impact on overall picture quality, giving the image the 'pop' that we're all looking for.
In general, the higher the contrast, the better the picture. The amount of Contrast we get with the Projector varies in the opposite way from Lumen output, so that Contrast is lowest at the shortest Throw Distance, and greatest at the longest Throw.
But there is a way to have our cake and eat it too!
2. Laser Output:
The Projector has 3 different levels of Laser Output: Low, Medium and High.
Which setting is “best” will depend on the Throw Distance, along with the Screen's Size and Gain. The goal is to achieve the proper number of Nits (brightness) for both SDR and HDR as we talked about above.
3. Aperture:
Aperture is the opening through which the Projector sends its light, analogous to the iris of your eye, or a camera. With the Aperture wide open, the greatest amount of light comes through, but with the lowest amount of Contrast. As you close it down, the amount of light decreases, while the Contrast increases.
Your NZ projector has adjustable aperture which we will use to our advantage to get both the right light output and the best contrast.
To determine the number of Nits you have requires the use of a Light Meter (you can use a Light Meter App on your SmartPhone, or purchase a Meter for this purpose. A great one for the money is the Dr. Meter which can be purchased on Amazon).
Being able to take measurements of these different levels is critical to getting the best combination of output and contrast.
4. Dynamic Laser:
This feature allows the Projector to automatically lower the Laser Output in the darker scenes of a given show or movie, deepening the Black Level. One of the key benefits of having a JVC Projector is having “inky blacks” which contributes to the amazing picture quality they have.
Of course, when the Laser Output is lowered, this will also decrease the amount of light available for the brighter elements still on screen. However, your JVC projector looks to compensate for this, through a process called “gamma manipulation” where it boosts the brighter elements in the scene.
We will show you how to enable it in the next section.
Application Section: Putting it All Together
As noted earlier, JVC ships the NZ series Projector with almost all of the settings needed for most users/environments. Thus, it is beneficial NOT to change any of the Projector’s settings EXCEPT for the ones we will discuss below. Adjusting the settings below will provide the best combination of light output and contrast for your unique setting.
1. Maximize Brightness
- We assume you have already mounted your projector according to our instructions in the first section
- This will give you the most light output with the least contrast but we will adjust that next
2. Measure Light Levels
We want you to do this for all three of the laser output levels for both SDR and HDR to get a baseline for your system. You will have 6 numbers when you are done
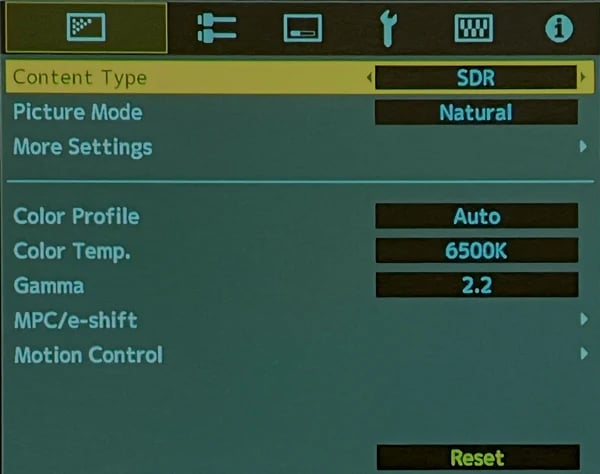
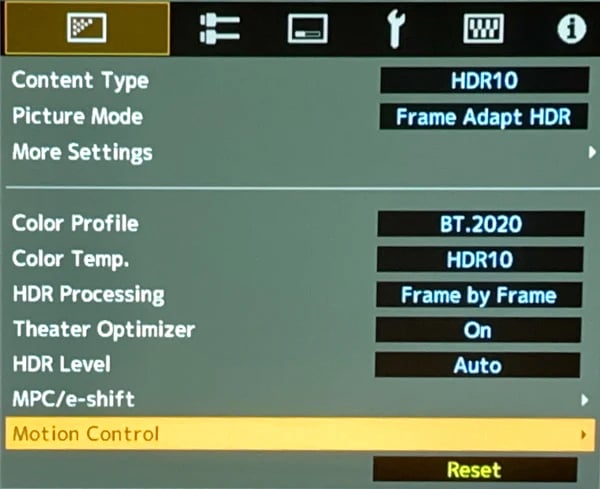
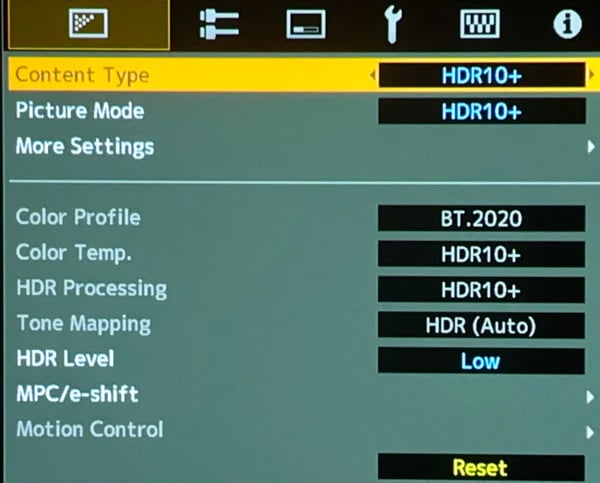
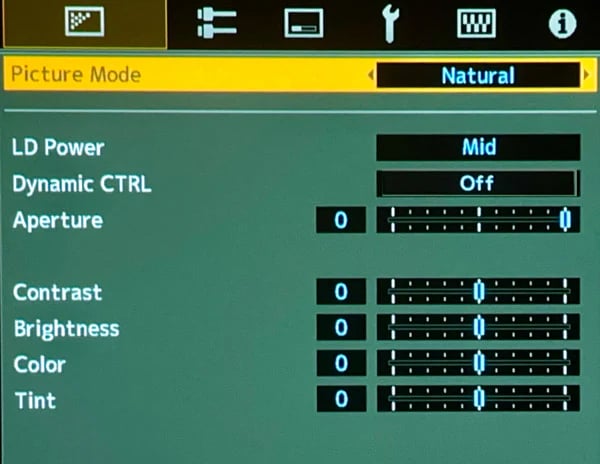
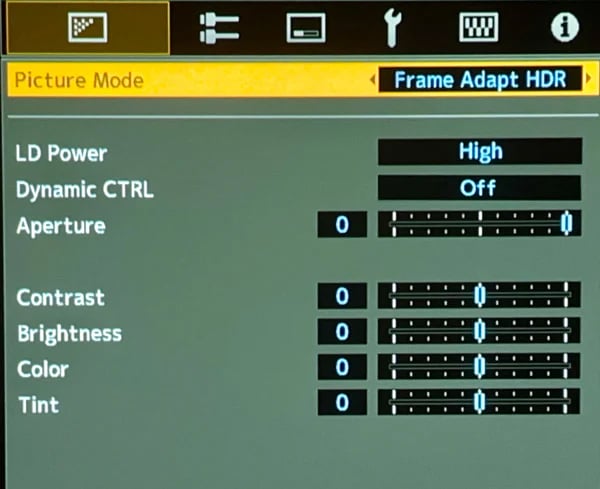
Go back to the Picture Mode tab in the top left and navigate to the screen you see below, You want to make sure that Dynamic CTRL is Off, then for SDR (Natural) you will measure the light output with LD Power set to Low, Mid, and High, then do the same for HDR (Frame Adapt HDR)