


How to Get the Best Audio and Video from Your Roku in a Home Theater or Media Room

If you're building out a home theater or media room and using a Roku as your streaming source, you're probably wondering if there’s anything you can do to squeeze out a little more performance. Maybe you just picked up a new TV or a projector, or maybe you’ve invested in a surround sound system or Dolby Atmos soundbar, and you want to be sure your Roku isn’t holding anything back.
The good news is, Roku can absolutely be a great part of your setup. But just like with any piece of gear, the right settings and setup can make all the difference.
So let’s break down everything you need to know to get the best video and audio quality from your Roku, no matter what kind of setup you’re working with. At the bottom of this article, we will leave a checklist that you can use as you follow along to be sure you’ve done each tip.
Let’s start with the basics. When it comes to performance, not all Rokus are created equal. If you want the best possible picture and sound quality, the Roku Ultra is still the top dog. It supports 4K resolution, HDR10, HDR10+, Dolby Vision, and even Dolby Atmos audio. It also has an Ethernet port for a hardwired connection, which can really help with consistent 4K streaming.
The Roku streaming sticks are a solid runner-up and could be great for smaller setups or secondary TVs, but if you’ve got a projector, a big TV, or an Atmos-capable sound system, we’d recommend springing for the Ultra all day long.
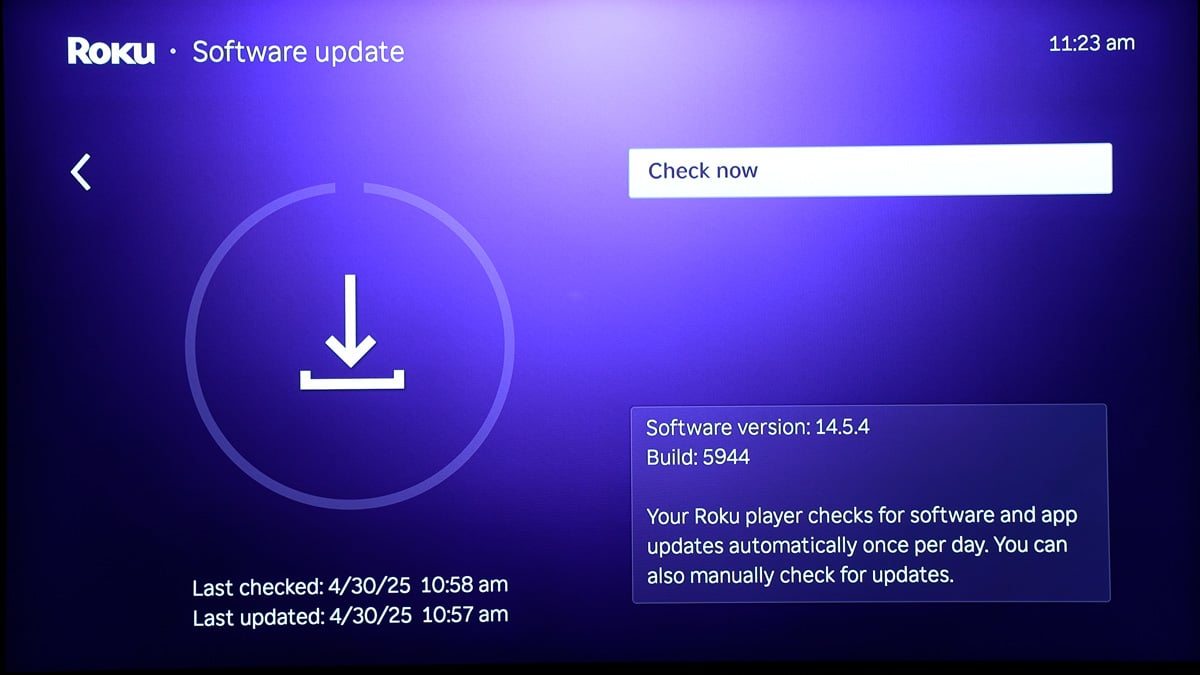
First, go to Settings > System > Software Update and check for updates. Roku devices update automatically in the background, but it’s always a good idea to manually check when you're setting things up or troubleshooting. Having the latest firmware ensures you’re getting support for the newest features like Dolby Vision, frame rate matching, and the most accurate display detection.
Next, if you’re using your Roku in a home theater setup with multiple sources — like a Blu-ray player, game console, or Apple TV — you may want to turn off a setting called 1-Touch Play under Settings > System > Control Other Devices. This is Roku’s implementation of HDMI-CEC, which lets the Roku control your TV’s power and input switching. While it sounds convenient, it can cause issues in more advanced setups. For example, if the Roku goes to sleep, it might shut off your TV even while you're watching a different source. Disabling 1-Touch Play gives you more reliable control and avoids unexpected behavior, especially if you're switching between sources often.
Now, let’s start with video settings. One of the most important things you can do is double-check your Roku’s Display Type. Roku usually auto-detects the resolution and HDR format your TV supports, but it doesn’t always get it right. So go into Settings > Display Type and make sure it’s set to “4K Dolby Vision HDR” or “4K HDR10 60fps TV,” whatever your display actually supports.
If your TV is capable of Dolby Vision and you’re not seeing that option, it could be because of a weak HDMI handshake, or because your TV input isn’t set to allow full signal bandwidth. Many TVs have an “HDMI Enhanced” or “Deep Color” setting that needs to be turned on for that input. Every brand calls it something different. LG calls it “HDMI Ultra HD Deep Color,” Sony uses “Enhanced Format,” Samsung has Input Signal Plus,” and so on. But the goal is the same: you want that HDMI input wide open for full 4K HDR at 60 frames per second. For a Sony TV, you’ll find this under Channels & Inputs > External Inputs > HDMI Signal Format. Not all HDMI inputs on your model may support the best format, so be sure your Roku is plugged into one of the HDMI inputs that allows the Enhanced Format or Enhanced Format (Dolby Vision). And for Sony TVs, you might not see the setting show it right away, but you can confirm after putting on content with Dolby Vision and checking your picture settings as its playing.
Once your Roku and TV are on the same page, you should also head into Settings > System > Advanced System Settings > Advanced Display Settings and look for an option called Auto-adjust display refresh rate. This is one of those nerdy but powerful features. When it’s turned on, your Roku will switch the output frame rate to match the content. So a 24 fps movie will actually play at 24 Hz instead of being forced into 60 Hz with motion judder. The screen might briefly go black when the refresh rate changes, but the trade-off is smoother, more natural motion, especially for film content.
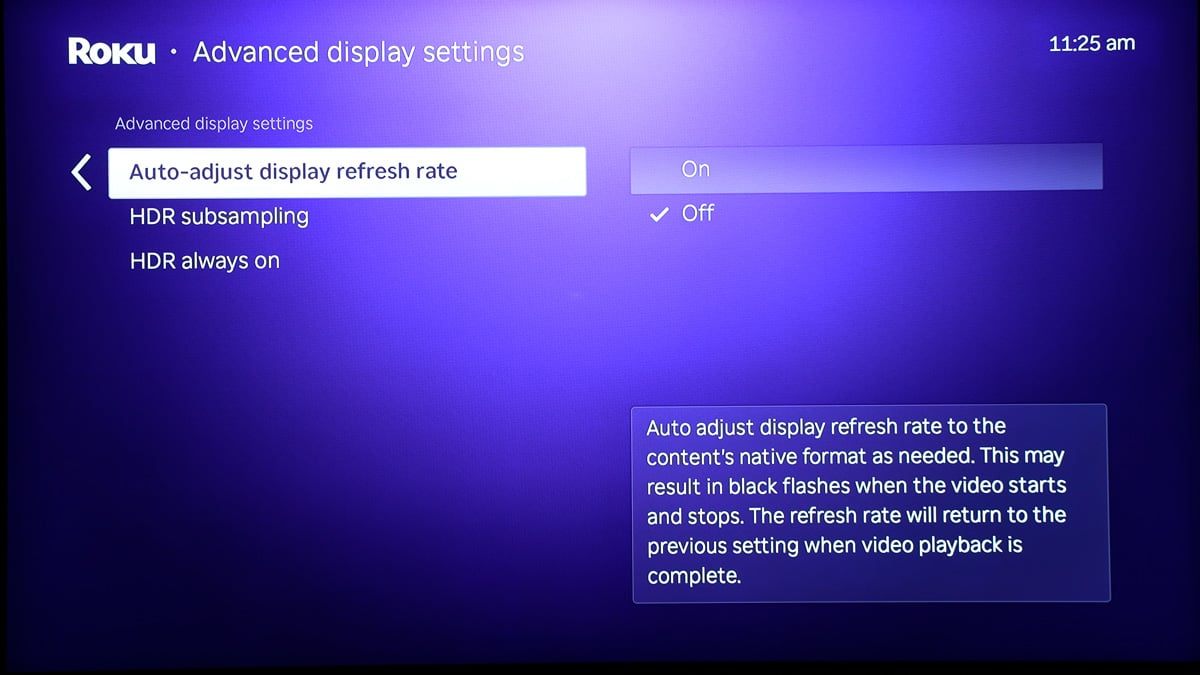
While you’re in the Advanced Display Settings menu, you might see an option for HDR subsampling. Roku gives you the choice between 4:2:0 and 4:2:2 color formats. We recommend starting with 4:2:2 if your TV and AVR can handle it, as it technically offers higher color fidelity. However, many setups—especially with longer HDMI runs or older gear—may run into compatibility issues like flickering, color distortion, or no signal at all.
If that happens, switch back to 4:2:0, which is the native format for nearly all streaming services including Netflix, Disney+, and Apple TV+. It’s far more stable, and in real-world use, you likely won’t notice any drop in picture quality.
And while you’re adjusting things, don’t forget to disable any motion smoothing or “soap opera effect” settings on your TV. Those can interfere with how 24p content looks, and they’re usually best left off in a home theater setting.
Alright, now let’s get into audio.
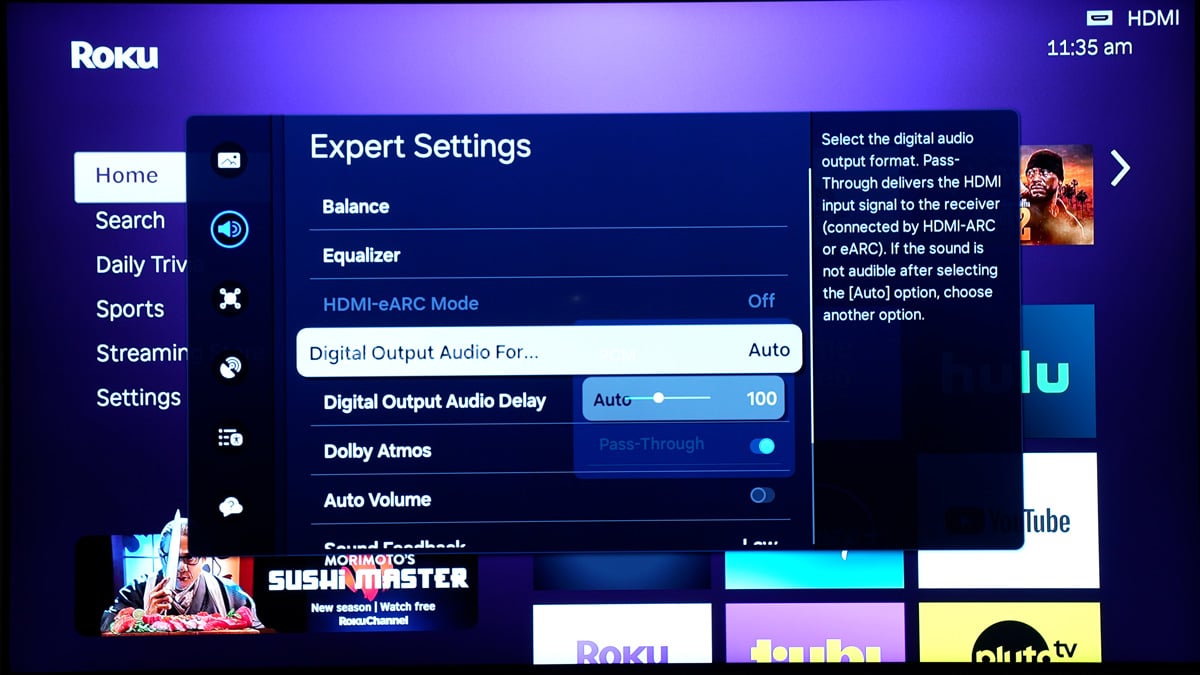
The first stop is Settings > Audio on your Roku. If you’re using a Roku Ultra or Streaming Stick with a full sound system or soundbar, make sure the Digital Output Format is set to Passthrough if your system supports it, or Auto. Auto tells the Roku to detect and send the correct audio format like Dolby Digital, Dolby Digital Plus, or Dolby Atmos, based on what your receiver or soundbar supports.
Another setting to watch out for is Volume Mode. This one can be tricky because it's not in the main settings menu. Instead, you’ll find it during playback by pressing the * button on your remote (the Options button). If Volume Mode is set to “Leveling” or “Night,” the Roku will downmix the audio to stereo in order to process it, which defeats the purpose of having a surround sound system. Make sure Volume Mode is set to Off if you're connected to an AVR or soundbar and want to hear full surround or Atmos soundtracks the way they were intended.
Now, depending on your setup, you might be routing audio in a few different ways. The ideal scenario is Roku into your AV receiver, and then video passed from the receiver to your TV. This way, your receiver gets the original audio signal and does all the decoding, whether it’s 5.1, DTS, or Dolby Atmos. Just make sure your AVR supports the video formats you're using, especially if you're watching Dolby Vision content.
If your receiver doesn’t support the latest HDMI formats, or if you’re using a soundbar, you might have your Roku connected to your TV, with audio returning to your audio device via ARC or eARC. In this setup, navigate to your TV's audio output settings and look for options like "Digital Sound Out" or "Audio Output Format." Set this to Auto or Bitstream, depending on what's available. These settings allow your TV to pass the original audio signal to your sound system without unnecessary processing. Avoid selecting PCM, as this can downmix the audio to stereo, preventing you from experiencing full surround sound or Dolby Atmos.
With this kind of setup, your TV becomes the middleman, so it’s really important that it’s passing through the signal correctly. If you’re not seeing Atmos on your soundbar or receiver’s display when playing Atmos content, double-check that your TV supports it and that eARC is enabled. eARC provides higher bandwidth than standard ARC, allowing for lossless audio formats and a more immersive sound experience.
One last tip: frame rate matching and high-bitrate HDR can sometimes trigger weird HDMI issues like quick blackouts, flashing, or color banding. If that happens, the culprit is often the HDMI cable. A good, certified High Speed or Ultra High Speed HDMI cable is essential, especially if you're running longer distances to a projector or AVR. Don’t let a $5 cable ruin your $5,000 setup.
If you're noticing lip sync issues, check your AVR or TV for an audio delay setting. Sometimes video processing or TV motion smoothing can delay the video relative to the audio. A small adjustment of 50–100 milliseconds is often all it takes to lock everything in perfectly. We have a lip sync video and tutorial on how to do this that you can simply play on YouTube to get it perfectly synced up.
A few bonus tips: If you want to clean up the look of your Roku’s home screen, head into Settings > Home Screen. From there, you can hide or disable submenus like “Featured Free,” “What to Watch,” or “Live TV.” While this won’t impact performance, it can make the interface feel less cluttered and help you or your family get to your favorite apps faster. It’s a nice finishing touch, especially if your Roku is part of a larger home theater system with lots of inputs.
While you’re in Settings, it’s also worth making a quick privacy adjustment. Go to Settings > Privacy > Advertising and turn on “Limit Ad Tracking.” This doesn’t eliminate ads entirely, but it does restrict how Roku personalizes them based on your usage and viewing data. If you prefer a bit more privacy or just want to minimize targeted ads, it’s an easy switch to make — and it has no negative impact on performance.
In the end, Roku can absolutely deliver a great experience in a home theater as long as it's configured properly. So grab your remote, tweak those settings, and get ready to enjoy what your Roku is capable of!
But wait! You may have everything configured for your Roku and some settings on your TV or projector after following this guide. However, there are actually more settings you should consider changing to really get the most from your setup. Even if you aren’t a tech nerd like most of us here at Audio Advice, we have videos and articles that walk you through the top video calibration tips and top audio calibration tips for your gear. We go over everything from how to get your projector perfectly in focus with free test patterns to where to place place your center channel speaker for the best performance.
We’re Here to Help!
If you have further questions, contact our experts via chat, phone, or email. Or simply visit one of our world-class showrooms to experience speakers, projectors, TVs, and everything in between for yourself before you make a purchase!
If you’re planning your home theater or media room, check out our Home Theater Design page, where we have everything Home Theater related, including our FREE Home Theater Design Tool.
When you buy from Audio Advice, you’re buying from a trusted seller since 1978. We offer Free Shipping, Lifetime Expert Support, and our Price Guarantee. We look forward to serving you!
Roku Home Theater Setup Checklist
General Setup
-
Go to Settings > System > Software Update and check for updates.
-
Rename your Roku device under Settings > System > About (e.g., “Theater Roku”) for better smart home integration.
-
Go to Settings > System > Control Other Devices and turn OFF 1-Touch Play to prevent HDMI-CEC conflicts.
-
Go to Settings > System > Power > Auto Power Savings and UNCHECK “After 20 minutes of no interaction.”
Video Settings
-
Go to Settings > Display Type and confirm it’s set to “4K Dolby Vision HDR” or “4K HDR10 60fps”, depending on your display.
-
On your TV, enable the enhanced HDMI setting for the Roku input:
- LG: “HDMI Ultra HD Deep Color”
- Sony: “Enhanced Format”
- Samsung: “Input Signal Plus”
-
Go to Settings > System > Advanced System Settings > Advanced Display Settings:
- Turn ON Auto-adjust display refresh rate.
- Ensure HDR subsampling is set to 4:2:2 for best quality or 4:2:0 for best streaming compatibility.
-
Disable motion smoothing (soap opera effect) in your TV’s settings.
Audio Settings
-
Go to Settings > Audio and set Digital Output Format to Auto.
-
During playback, press the * button and set Volume Mode to OFF to avoid stereo downmixing.
-
If connecting Roku to a receiver:
- Plug Roku into the AVR and pass video from AVR to the TV.
- Make sure your AVR supports Dolby Vision (if using it).
-
If connecting Roku to the TV with ARC/eARC:
- Set TV audio output to Bitstream or Auto (not PCM).
- Make sure eARC is enabled for Atmos or lossless audio.
Troubleshooting & Quality Tips
-
Use a certified High Speed or Ultra High Speed HDMI cable for 4K HDR and long cable runs.
-
Check for lip sync issues and use your AVR or TV’s audio delay setting if needed.
-
Use our lip sync calibration video from Audio Advice’s YouTube channel for easy syncing.
Bonus Tips
-
Go to Settings > Home Screen and disable unused submenu tiles to reduce clutter.
-
Go to Settings > Privacy > Advertising and turn on “Limit Ad Tracking” for more privacy.