Cambridge Audio Alva ST
Tips & Tricks

Setting up your Cambridge Audio Alva ST turntable can be fun and will go smoothly if you prepare for everything you’ll need in advance. We hope this guide enables you to spin some vinyl and enjoy music faster than you expected.

Prepare Where Your Turntable Will Be Positioned

If you have large speakers, it's a good idea to keep your new turntable away from them. Having your turntable too close to speakers can cause acoustic feedback which is a howling sound you’ll only need to hear once to know you’ve done something wrong! Help your turntable get off to a good start by putting it on a solid, level surface.  

You will want your turntable to be pretty close to your amplifier or phono preamp. It is important to remember the cables coming out of your turntable are carrying a very low-level signal. They are short on purpose for this reason. You also do not want to have an AC power cord running parallel to them. 

Unbox Your Turntable

We suggest you unbox your turntable either on the floor or on a table near its final position.  Save all of the packing (it will come in very handy when you move) and lay everything out so it's easy to get to. 

Go ahead and put your turntable in the spot you picked out for it.

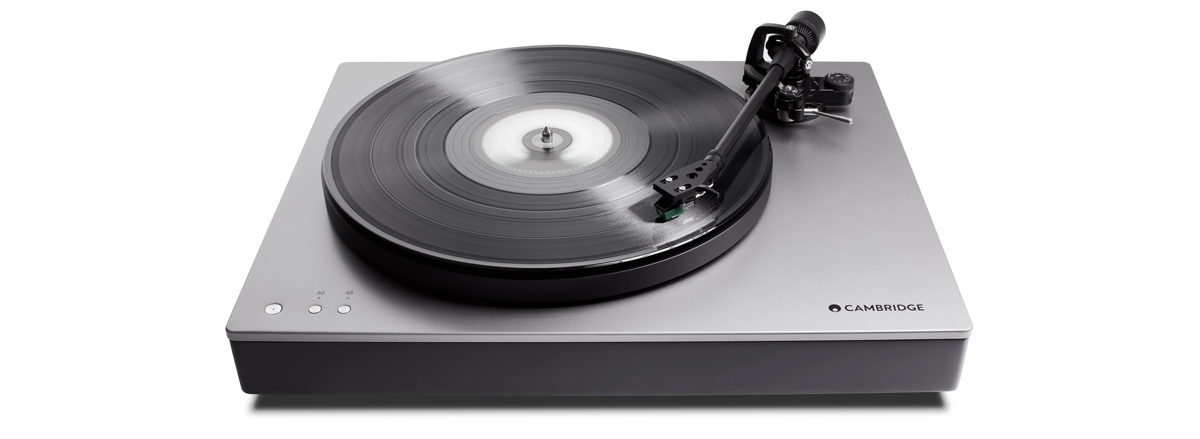
Make the Audio Connections

We feel it's best to connect everything up before you do the final assembly as it's easier to turn things around while the turntable is not fully assembled and everything should still be protected at this point.  

Your Alva turntable comes with a pair of audio cables and a separate ground wire.  If you are going to use the built-in phono preamp in your Alva ST, you will not need the ground wire.  Connect the cable with a red ring to the red connector and the other one with the black ring to the white connector.  These cables will connect to an AUX-type input on your integrated amp or receiver.  Do not connect them to one labeled phono.  Make sure the little switch next to the phono connections is set to LINE. 

If you are going to use a separate phono preamp or one built into your unit, connect the ground wire to the back of the turntable.  In this case, the other end of the RCA cables would go into your phono preamp.

Make the Power Connections

Find the power adaptor that matches the outlets in your country, snap it into the plug end and connect the other end of this cable to the power connection on the back of your Alva ST. Make sure this power cable does not run parallel to the audio cables coming out of your turntable.  

Start Assembly

Carefully center the platter on the bearing and lower it down. Make sure your hands are clean and spin the platter until the red tape holding the belt lines up with the motor.  Use the red tape to pull the belt away from the platter, then position it on the motor pulley.  Make sure it does not twist.  Now put the heavy mat on the platter. 

Balance the Arm and Set Anti-Skate

Make sure the tonearm is still locked down then twist the counterweight onto the back of the tonearm with the section with the lines on it pointing towards the front of the turntable.  Position it about halfway in.

Install the headshell onto the end of the tonearm, tighten the bayonet connection until it is snug, then carefully remove the stylus guard.  It just pulls straight out.  Hang on to the guard as you will want to put it back on when you clean your turntable.

Make sure the anti-skate is set to zero.  

Now we are going to balance the tonearm.  Unlock the arm and move the rear counterweight forwards or backward until the tonearm achieves zero gravity and is just floating.  Then, while holding the back part of the counterweight with one hand, spin the part with the lines on it until a larger white line is pointing straight up.  Now turn the whole counterweight counterclockwise and count through 4 larger white lines which will put you at 2 grams of tracking force.  Each larger line represents .5 grams.

Lock the tonearm down and turn the anti-skate dial to be at 2.0

Bluetooth

Like all Bluetooth devices with no display to show you what they are connecting to, you will need to shut down any other Bluetooth devices nearby as the Alva ST may grab those instead of the Bluetooth headphones or Bluetooth receiver you are trying to connect to.  If your device has an app that lets you see the devices, that will be very helpful, but not all do.  Make sure the turntable is powered on, slide the Bluetooth slider to the on position, and press the pairing button until the light starts flashing.  Now it should connect to your device or if you have an app, you may have to choose it.

Enjoy Some Music

Put on your favorite album and press the correct speed button.

Make sure the cueing arm is in the up position, move the tonearm over the beginning of your record, lower the cue and enjoy the music!

Care and Maintenance

To protect your table, install the dust cover.  It simply drops into the two rear slots. We feel you get a very minor improvement in performance if you remove the dust cover when you are playing records.  

Your table also comes with a nice stylus cleaning brush. We suggest you use the brush after.

We hope this quick setup guide explains everything you need to know to enjoy your vinyl with the Cambridge Audio ST . If you have any questions, you can chat with an expert at AudioAdvice.com, call us, or visit one of our world-class showrooms.

MORE VIDEOS & REVIEWS

Wishlist
Copyright © 2024 Audio Advice. All rights reserved.